Friday, August 5, 2016

Best apps for living an alternate life

We have all, at one time or another, wondered what it would be like to live the life of someone or something else. Thanks to the empowering benefits of technology, we can get closer than ever to realizing this fantasy. Whether you want to try being a big-shot venture capitalist or a simple cud-chewing goat, there's an app out there for you.smartphone hero
A famous philosophical thought experiment, called "what it's like to be a bat", poses that we can never truly know what it is like to have the consciousness of another. While this is still probably true, there a variety of apps that can get you really close to the mind of a man driving a train. Let's see what other things we can pretend to be through apps.

Goat Simulator

As I promised, it is indeed possible to live the life of a simple goat. In reality, there are over 300 distinct breeds of goat, so if it's a specific genus you're looking for, this simulator might disappoint you, as there are only a dozen or so different goats, and one of them is a penguin.
Screenshot 20160603 101054
Despite this, Goat Simulator offers plenty of mindless fun as you storm around town, tongue flapping, your little goat form leaping and trampolining. The terrible physics engine only adds to the hilarity. Watch as your goat tumbles like a ruminant rag doll through the air after headbutting a gas pump; observe as a panic-stricken party-goer flails headlong into a barbecue following an innocent lick of your flailing goat tongue.
Screenshot 20160603 100515

DB Train Simulator

We've all been on a train. I go on one every day. But how many of us have driven one? I'm guessing not many. It's a common childhood fantasy, but as this "game" will teach you, it's actually one of the dullest things someone can do. Deutsche Bahn has added an energy-saving element, in an attempt to make things more interesting, or teach us something – probably both – but it only paints the game a duller shade of gray.

The thing is, though, that all of this only serves to make DB Train Simulator a better train simulator. There's no glitz or glamour here, just you, two buttons and a lever. The thankless life of the train driver gains stark and unforgiving clarity as people stand on the platform waiting for you to miss the stop signal and have to restart the level. It's like magic dust, except it's just plain old dust that you have to vacuum up every weekend.
Screenshot 20160603 104247

Best Brokers

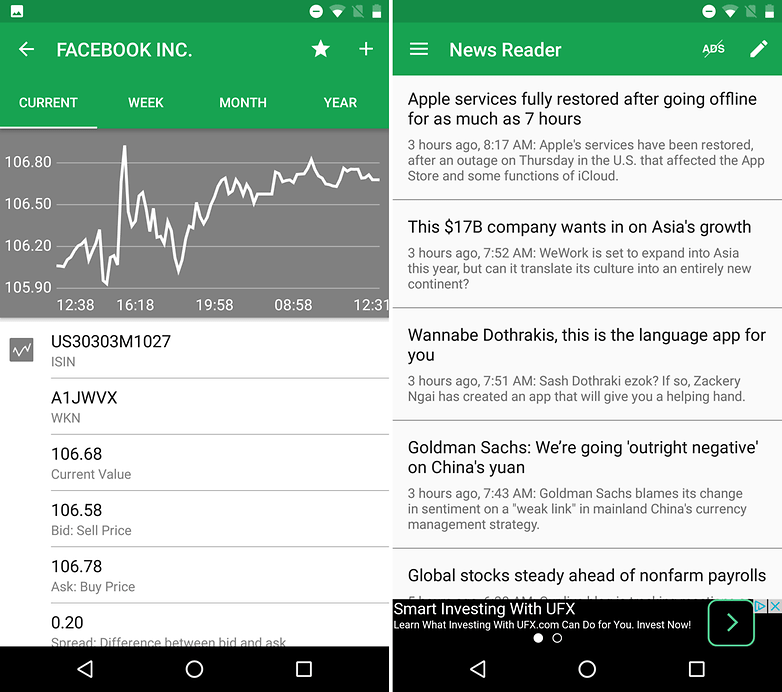
The stock market is a very foreign place to most people, full of numbers, lines and arrows, and hypothetical things managed by robots. What could be a better environment to live out your alternate life in? The only problem is that to be a day trader requires money, lots of money.

Well, not any more! Because by downloading Best Brokers to your phone, you can instantly acquire $25,000 of pretend money to spend on stocks. There are over 50,000 real-time stocks for you to buy and sell. Build your portfolio and follow the latest stock market news in a bid to make more! Or lose everything. But you don't actually lose everything, because none of it's real.

I've been playing the game for almost a week, and, at the time of writing, I've managed to lose $601.23, but this figure fails to capture the scale of the drama that stalked every decision along the way.
androidpit best apps alternate life best brokers

Meetup

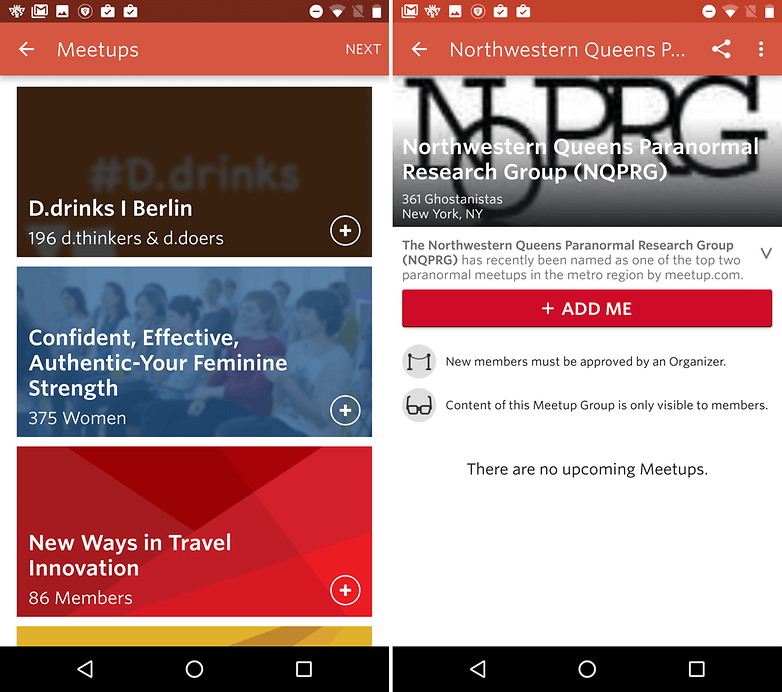
If you're confident enough to take your alternate life into reality, Meetup is a great way to find strange things that people are meeting to share their interest in. Whether it's pugs, oil or the paranormal, you can find out what's going on in your area and perhaps venture out to see what it's like to share an avid interest in Mediterranean pirates.
androidpit best apps alternate life meetups

You don't even have to like soccer to get something out of a soccer management game. The sense of satisfaction you feel when your carefully selected players combine to place the ball in the back of the net is unparalleled. PES Club Manager, although a bit heavy on the freemium, is a great in-depth and varied soccer management game.

You can build up your team's home town, train your players, edit your squad, and then take them out onto the field and adjust your strategy while watching them fight it out in 2D or 3D.

The game, sadly, does not include expensive boats or a shady past; these you will have to provide yourself.
Screenshot 20160603 141511


How do you escape the monotony your life through technology? Let us know in the comments.

Best launchers of 2016: transform your Android

One of the most impressive ways to customize your smartphone is to install a launcher. Launchers allow you to take advantage of tons of custom Android themes and icons, as well as offering near complete control over how your phone performs when switching screens, launching apps and more. Here are the best launchers for your Android smartphone or tablet.AndroidPIT best launchers

ZenUI

ZenUI is a launcher which bridges the gap between the bloatware-heavy, low-end launchers – brimming with ads and unwanted apps – and the more intricate, enthusiast launchers.

ZenUI not only has a pool of high-quality themes – and the expected dearth of shabby ones – to choose from, but it also includes advanced customization features for those who want to refine their Android experience.

Developed by Asus, this Launcher does feature some of the trappings of the more spam-y, bloatware-y launchers, such as the awkward search menu, accessed with an upward swipe, setup by default with trending search suggestions. But, like the three Zen-specific shortcuts, it adds to the home screen, this can easily be removed.

You can adjust the home screen grid size, transitional animations for moving between home screens (the ‘accordion’ one is particularly nice) – you can even theme the folders.
Afficher l'image d'origine
What’s more, ZenUI includes a security tool for apps, CM Applock for Asus (provided by Clean Master developer Cheetah Mobile) to prevent unwanted users from accessing certain content

The applock works similarly to a screen lock. However, this component can be used with an ‘intruder-selfie’ function which employs your phone's front-facing camera to snap a picture of a person trying to enter the app. This only works if the person has a failed attempt at opening the app first, before getting inside. It would be far more interesting if it just snapped users trying to access your apps. Still, it might be fun to show a few friends.

Finally, ZenUI supplies an ‘unread counts badge’ so you can see how many unread messages or notifications you have for each app: it’s considered a premium feature in some launchers. It’s functional, and support for this does extend to WhatsApp, which is probably where most people would want it.

It’s intuitive, customizable and has possibly the most impressive selection of icon packs and themes of any product on the list. This could be your best entry point into the world of launchers.

Price: Free
Size: 22 MB
Android requirement: 4.3 and above
Version tested: 2.2.2.17_16051

Smart Launcher Pro 3

Smart Launcher Pro 3 has its own distinct flavor and is unlike any launcher on the list. It begins with a short setup procedure where you are asked for your preferred dialer app, music app, and photo app from those you have installed (if you have any installed).

Select them, hit start, and you’ll be dropped into a single home screen populated by six apps, some of which were determined in the previous steps. A swipe left brings up an organized app drawer (Smart Launcher organizes it automatically, you can't change the order) and swiping to the right brings up several screens designed for widgets.

That’s it. A single home screen with six apps. You can increase the number of these apps or remove existing ones, as well as customize what they do. But, crucially, you can’t add more home screens.

It’s a minimalist setup and an interesting design decision. One might ask why there is only one home screen for apps but three screens for widgets when they’re typically fewer in number?

This, I presume, is to force users to create a manageable single space. If you’re aiming for a less cluttered home screen, Smart Launcher Pro 3 necessitates it.

Smart Launcher Pro 3 implements a handful of functions to make single home screen usage easier. Chief among these is the extra function that each app button can make use of. You can use a single tap for one action or a double tap for another. This is a great way to save space on the home screen because each app button has the potential to open two apps.
Afficher l'image d'origine
How about making your dialer app open in one tap, and making contacts appear with a double tap? Or you might consider launching WhatsApp with one tap, and Facebook Messenger with a double? Maybe a single touch on the camera icon will launch your camera app, while tapping twice could start Instagram?

You don’t have to make use of this feature, but it works, and highlights what the developers have done to support the core goal of singular home screen use, rather than spamming the app with hundreds of incongruous features.

You can also customize how the app drawer looks in several interesting ways. It defaults to a flower-petal setup: six apps in a circle. But you can change it to a simple grid, like on a standard home screen, Honeycomb style, or – my favorite – Arch. This gathers apps in a non-linear format which climbs up the side of your display. It looks organic and very cool.

Smart Launcher Pro 3 supports free and premium themes that compliment its already sophisticated look. But I’d say its focus is more on usability than style. If you want to redefine the way you use your phone and optimize it for ease-of-use, give this one a try.

Price: $3.99
Size: Varies with device
Android requirement: Varies with device
Version tested: 3.16

Arrow Launcher

This is a Microsoft product and it feels like a work in progress. But wait, before you run and hide, hear me out. Arrow is a very interesting launcher for several reasons. Firstly, it doesn't look like any other launcher and lacks bloatware apps and boosters, so it’s already noteworthy.

But also unlike many other launchers, its focus is not on fancy looks and dazzling transitions; Arrow Launcher appears to be aimed at business-type users. This is evident from the use of its relatively plain wallpaper and home screen headings like People (a contacts list) and Reminders.

I currently make use of several Android apps for notes and planning: Reminders is an entire home screen dedicated to this. It's perfect for the type of user it targets and this page also integrates with to-do list app Wunderlist. It's a good idea, but it would great if it supported other apps like Evernote or Google Keep (though admittedly I don’t even know how this would work).Afficher l'image d'origine
Another of Arrow’s strengths is its Recent menu. I don’t use the native Android recent apps menu because I think it's clumsy – I have dozens of thumbnails of every previously used app, so finding what I want can be difficult.

Arrow Launcher, by contrast, displays recent items not by app but by content. It begins with recent pictures and then is followed by other content, such as downloads, videos or recently contacted people. It might not be there with a single button press like Google's recent apps and it's function isn't exactly the same, but it’s nonetheless intuitive and useful.

Arrow is a light and simple launcher compared to most others but because of this it does have fewer customization options: you can't change app icon sizes and font styles here (though you can use custom icons).

Regardless, it's still one of the best launchers in my recent tests. It’s a dry Microsoft product that lacks some versatility, but it's nonetheless fresh, unique and something which I'm sure could serve a certain type of user better than its stock launcher.

Price: Free
Size: 9.1 MB
Android requirement: 4.0.3 and above
Version tested: 1.4.0.23967

Nova Launcher Prime

We have written extensively about Nova Launcher Prime, with a whole bunch of tips and tricks. Many say this app is the reason to buy an Android phone rather than an iPhone and it's easy to understand why.

Nova doesn’t look like much when you first open it. You won’t see 3D floating clocks or animated weather apps like in some launchers: it includes just three folders labeled Google, Create and Play, a Google Search Bar and a Gmail widget on the left home screen.

But open up the settings menu and you'll find a trove of options for customizing a whole range of features: from app margins and sizes, to font colors and appearance, to your app drawer layout and animation effects, to screen gestures, to dock settings to unread badges; the list goes on.

Essentially, as far as customizing Android without Root goes, Nova Launcher offers about as many options as you’re likely to find.
Afficher l'image d'origine
This launcher is filled with small but impressive details like the possibility to add a colored dock bar to the background of the bottom shortcuts area (where you normally find your Camera, Dialer and Contacts apps). It’s purely an aesthetic option, but the fact that you have options like this makes Nova so interesting.

You can also alter the number of app icons which appear in the dock, from one to seven – a feature you won’t find in most other launchers which optimizes the space at the bottom screen. Like Apex Launcher, it even lets you increase the number of these dock pages (in this case up to five).

The overall performance is buttery smooth and Nova supports a slew of gestures. I can’t help but find it incredibly cool when I use the clockwise two finger gesture to open my banking app – as if cracking open a safe. It’s the potential that Nova Launcher offers a smartphone that makes it so worthwhile.

Disappointingly, TeslaCoil hasn’t updated the app since December last year, but hopefully when Android 7.0 Nougat is released some additional content will be added. For now, we’ll just have to settle with one of the most user-friendly and varied launchers on Android.

Price: $0.99 (currently sale, free version also available)
Size: 49 KB
Android requirement: 4.0 and above

Apex Launcher

Apex Launcher is a feature-packed launcher with free and premium versions, but even the non-paid version offers a huge amount of customization and doesn't contain ads or bloatware apps.

Apex Launcher is in many ways very similar to Nova, offering a wealth of options for the app drawer, dock bar, folders and home screen and it even includes a backup option for transferring the same settings to other devices.

So it's dense, but unlike Nova it also supports a huge selection of themes. These custom-made icon packs and wallpapers can be very impressive and show off what's great about Apex.

You can also customize the home button to house more than one action. One press will bring you to your home screen, as usual, but a second press could be used for any number of shortcuts, like opening another app, taking you to your notifications, or launching the Apex Settings menu.Afficher l'image d'origine
One of the coolest features of Apex is that you can make use of several dock bars. This is traditionally comprised of four to five fixed buttons, but, like home screens, Apex Launcher allows you to make use of a few of these. This means that you can optimize toolbars for certain tasks. You might want to have a toolbar for calendars and diary info or a toolbar just for media viewing. Perhaps you could set one up with shortcuts to your favorite websites?

This is a strong alternative to Nova Launcher and definitely its closest competitor, there really isn't all that much daylight between the two; if you glance at their settings menus they almost identical.

But Apex hasn’t been updated in more than a year now: it’s not really optimized for the latest Android versions. It’s light on transition effects and lacks a transition effects animation preview, which would be nice. It's also light on gestures, though more of these can be added to if you purchase the pro version.

This may swing it for you, but if you're tied between these two launchers, try the free versions of both out first before you decide if you want to spend any cash.

Price: Free
Size: 4.7 MB
Android requirement: 4.0.3 and above

Are you rocking a custom launcher that we've missed? What do you think is the best Android launcher? Let us know in the comments.

What is a VPN app and why do I need one?

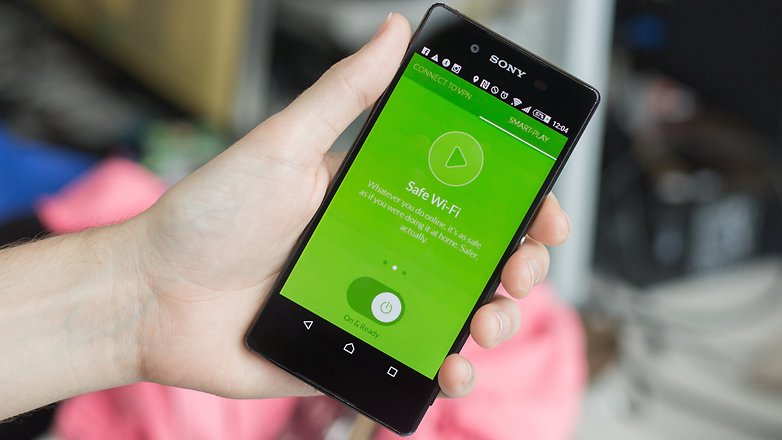
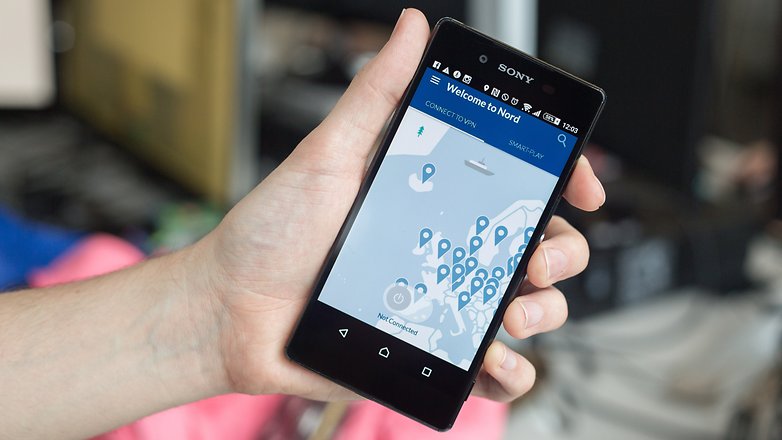
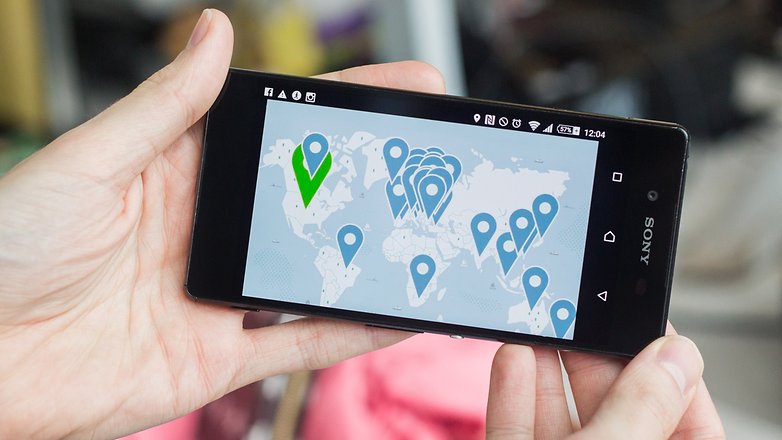
If you worry about online safety and haven’t thought about getting a VPN, it might be to time to consider it. VPN subscription prices are dropping and VPN apps are getting better all the time, so, in this article, we're going to discuss what a VPN is, how it works and why should you get one.ANDROIDPIT vpn 4

What is a VPN?

VPN stands for virtual private network and is a service that provides a secure internet connection by using private networks in remote locations. Using a VPN service can make it seem as if you are accessing the internet from an entirely different location, helping you to maintain security and privacy while online, among other things.

What is a VPN app?

A VPN app brings the aforementioned service to your smartphone. Simply install a VPN app and select a location and your online activity will appear to be taking place in that region.

Why would I want a VPN?

First and foremost, for increased privacy. VPNs can help control the information that companies or the government attempt to gather from you. It can also encrypt data so that your online activity isn't visible.

If you’ve ever tried to access a coffee shop Wi-Fi network, only to be warned that the connection is not secure, then you should think about a VPN: you never know who's watching.ANDROIDPIT vpn 1
Regardless of how concerned you are about online privacy, there is one key takeaway: your activity online is logged in many places, by many services, and it will be less visible if you use a VPN.

The second reason you might want a VPN is to access video streaming websites that you otherwise couldn’t. Say you’re on holiday in Bangkok, but want to continue watching that TV series you were enjoying on Netflix back home. Typically you wouldn’t be able to access this in a different country, but a VPN app would allow you to do that.

A VPN can also be used to avoid price discrimination, by masking your location and making it more difficult to track you.

Is using a VPN illegal?

In some countries, such as China, North Korea and Iran, it is illegal to use a VPN, but in most western territories (including the US and UK) it’s perfectly legal. VPNs are often used by businesses, schools and universities to give people access to their resources when they're not on the premises.

However, while using a VPN is perfectly legal, using it for certain purposes is not. The same applies to use of the internet in general.
ANDROIDPIT vpn 2
We are often asked whether it is legal to stream region-locked movies and TV shows in other countries. This is something that is in a state of flux, but the (somewhat disappointing) current answer is, not really.

I reached out to Netflix regarding this matter, and a member of its support team told me: "Customers that use services to change the IP location of their computers to watch content available in other regions [are acting] against our terms of use."

Hulu's Terms page explicitly states: "Using technologies to access the Content from territories where Hulu does not have rights or does not offer services is prohibited. Your subscription is not accessible through any devices from outside the United States."

Other streaming services may not enforce this so stringently and these laws are being questioned because they don't allow for certain exceptional circumstances, such as when people are traveling. You should always check a service's terms and conditions before trying to access it with a VPN.

What a VPN app won't do

There are VPNs that claim they can improve download and browsing speed. However, VPNs actually reduce these things, because there is an extra step involved in re-routing your connection.

Also, some suggest they can make you completely anonymous: this is almost always untrue. You can certainly gain a more private connection but complete anonymity is really hard to achieve online.
ANDROIDPIT vpn 3

How much does a VPN cost?

The costs of VPNs vary, but the vast majority are subscription-based services, which cost between US$5 and $15 per month. If you're interesting in picking one up, our AndroidPIT deals store has regular deals on all kinds of VPNs for every purpose, including some great lifetime subscription offers. Head over there now to check them out.

How to set up a VPN on Android

Outside of apps, you can still make use of web-based VPNs on Android if you have the IDs, make sure you know what they are or can access them before beginning.

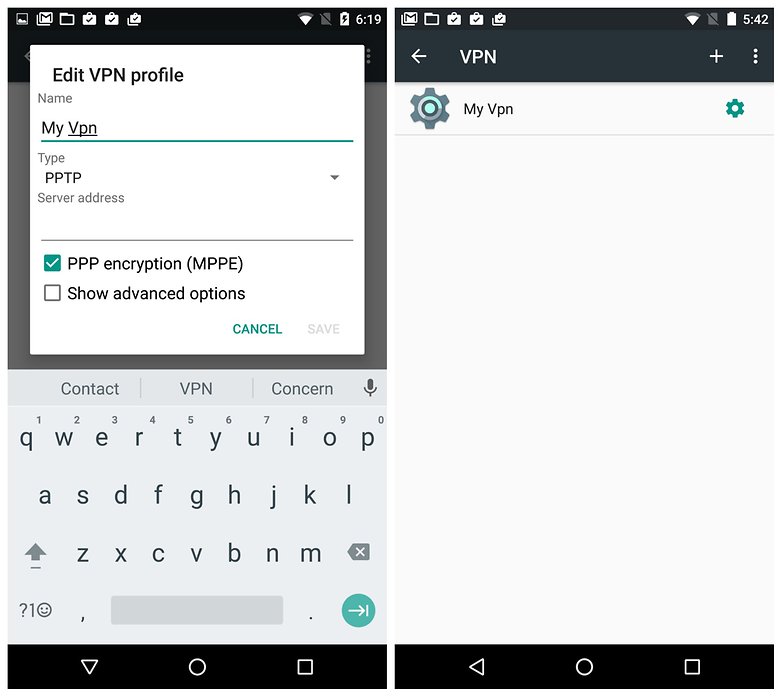
As always, the steps in the settings and the names for each section might vary depending on your Android device. On stock Android, the procedure is as follows:

  • Go to settings > more > VPN and hit the plus button at the top right.
  • Tap on the Name box and choose a name for the VPN network.
  • In the Type box, choose a VPN type that corresponds to your VPN server.
  • Enter the server address.
  • Leave the PPP encryption box ticked.
  • Hit Save and you will be returned to the original VPN menu.
  • Tap on your new VPN and enter the username you’ve chosen as well as your password.
androidpit vpn guide 1

Final thoughts

Aside from the financial burden, there aren't a lot of negatives involved in using a VPN, even if you want your IP to remain in roughly the same location (or within the same country) as you.

VPN apps will mean your smartphone uses slightly more data that it otherwise would when they are enabled, but it's up to you how much that matters. 

Ultimately, online threats are real, and because we use our smartphones to access the internet in many locations, it makes sense to make them as secure as possible. 

What are your thoughts on VPNs and VPN apps? Are you worried about the online dangers your smartphone can lead to? Let us know in the comments. 

The best Chinese smartphones you should know about

Chinese smartphones have emerged from a murky past of iPhone clones and shady software to become a new force on the global market. Chinese phones tend to be a lot cheaper than phones sold in the West but often have equally good build quality and features. Here are the best Chinese smartphones.

OnePlus 3

The third model in the OnePlus flagship series, the OnePlus 3 was launched on June 14, 2016. It ditched the invite system that generated a lot of buzz for previous models but mostly served to annoy customers. This device ushered in a new era for OnePlus and demonstrated a newfound maturity in the Android market.

The thing that stood out the most for us was the performance of the OnePlus 3. It comes with a quad-core Snapdragon 820 backed with 6 GB of RAM. This device outdid every phone we have in the office with an AnTuTu benchmark of 140,573. If you’re looking for a Chinese phone that performs well then this is your best bet.

The performance was not the only part of the phone that impressed us. The design is minimalist and in the same class as the Galaxy S7. And although the display was not as good as we had hoped, OnePlus made up for it with a quality camera. And the value cannot be beaten.
AndroidPIT oneplus 3 7921

Huawei P9

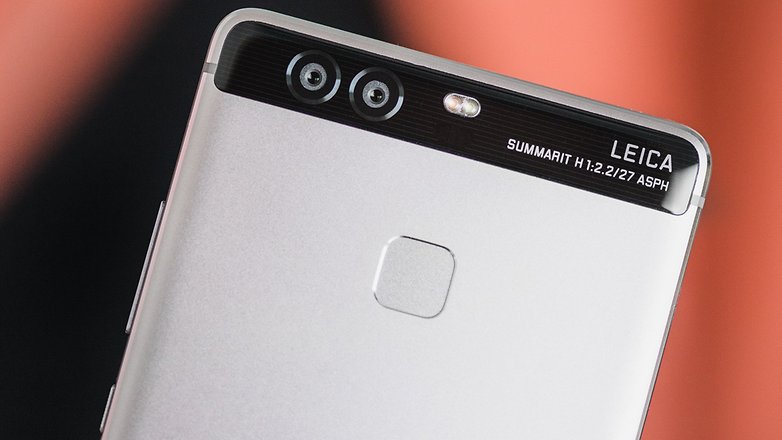
The fourth model of the Huawei P series is dubbed the 'Pocket DSLR'. That's because the company partnered with German camera manufacturer Leica to make a device focused around photo capabilities. The smartphone has a dual camera system with two rear cameras.

Despite having a better camera and taking higher quality photos the device is still priced under its competitors. It's not a cheap Chinese phone but in general is not expensive at $559. And unlike other Chinese manufacturers, Huawei has a strong presence in the US.

The Huawei P9 comes with Android Marshmallow right out of the box. The HiSilicon Kirin 955 chipset is backed up with 3 GB RAM. The device has an internal memory capacity of 32 GB and can be expanded with the microSD capabilities. The phone runs on a 3,000 mAh battery.
AndroidPIT huawei p9 review 3604

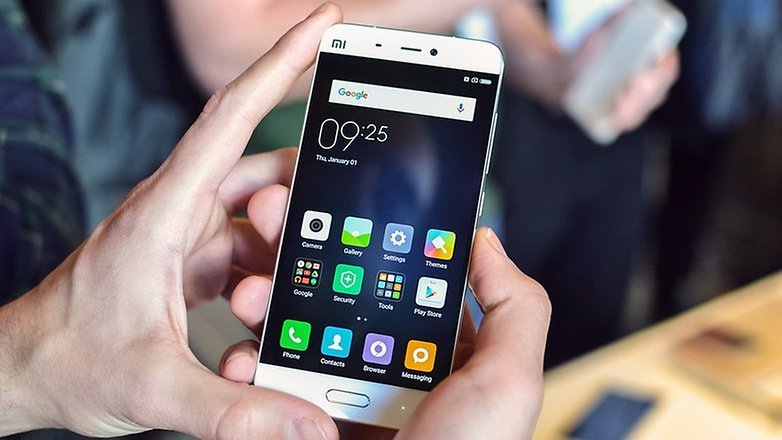
Xiaomi Mi 5 and Mi 5 Pro

Xiaomi made a big splash at MWC 2016 with its new flagship Mi 5 series. These long awaited devices are currently confirmed for the Indian and Chinese markets but Xiaomi's Global VP said in an interview that Xiaomi has "other markets on their radar screen."

The design and specs of these two devices are impressive. The normal Mi 5 version has a 3D glass rear panel, 32 GB or 64 GB of internal storage and 3 GB of RAM. The Pro version comes with a ceramic back, 128 GB of internal storage and 4 GB RAM. Both come with a Snapdragon 820 processor and a new 4-axis optical image stabilization system that wowed at MWC 2016.

The incredible prices of these devices is perhaps the most remarkable thing about them. The lowest cost (32 GB) version is set to be released at $407.99. The 64 GB Mi 5 version is going to come in at $459.99 and the Mi 5 Pro at $515.99.
xiaomi mi 53

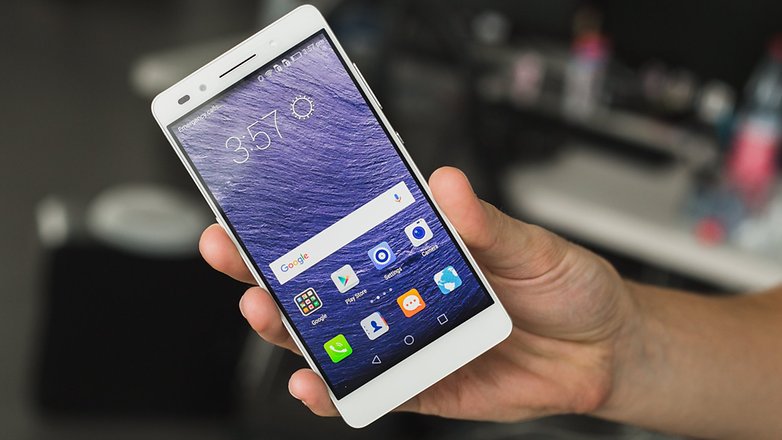
Honor 7 

The Honor 7 is boss. A $300 all-aluminum smartphone with looks to rival the HTC One M9 or Huawei Mate S, the Honor 7 also packs a punch in the specs department.

Packing a Huawei-made finger scanner, Kirin 935 chipset, 3 GB of RAM, Android Lollipop, microSD expansion, a massive 20 MP primary camera with OIS, and an 8 MP front-facing camera complete with LED flash, the Honor 7 is unbeatable. Check out our Honor 7 review for more details.
Honor 7 0

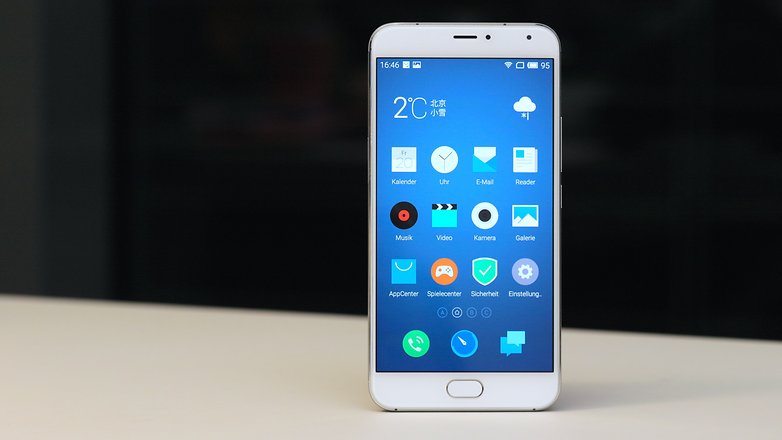
Meizu Pro 5 

The Meizu Pro 5 ups the price point to just under the $500 mark, but it is a very capable smartphone.

Packing Samsung's excellent Exynos 7420 chipset – the same as the Galaxy S6 – clocked at 2.5 GHz, a 21 MP camera, 3 GB or 4 GB of RAM, front-mounted fingerprint scanner, 5.7-inch Full HD display, Android Lollipop and solid 3,000 mAh battery, the Meizu Pro 5 is one to look out for.androdipit meizu pro 5 screen

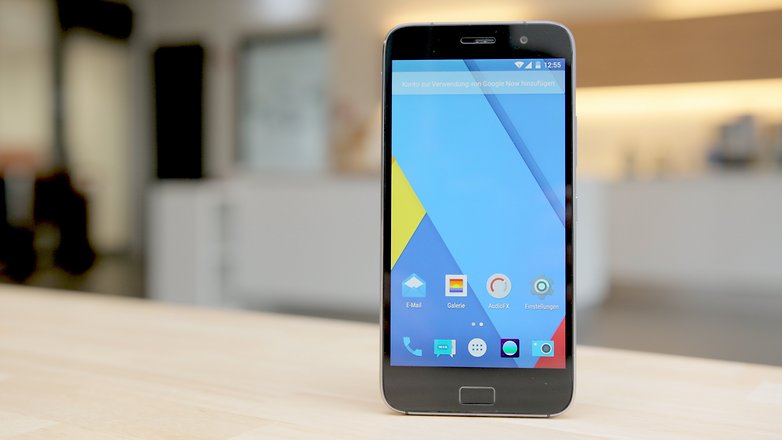
ZUK Z1 

You may not have heard of the ZUK Z1, but you'll wish you had. Backed by Lenovo, the ZUK Z1 has outstanding battery life, a rock-solid fingerprint scanner, good performance and a very decent camera, all for the low price of $220.

The ZUK Z1 also features a 5.5-inch Full HD display, Snapdragon 801, CyanogenMod OS 12 (based on Lollipop), 64 GB internal storage, 3 GB of RAM, a 4,100 mAh battery and 13 MP Sony sensor. Not bad at all.
lenovo zuk z1 screen

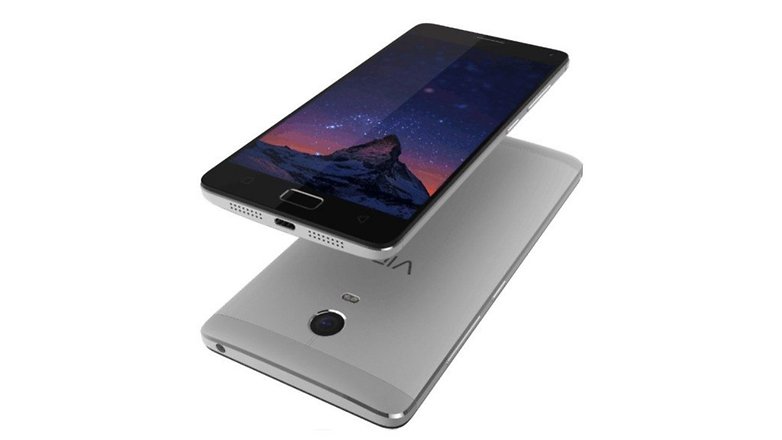
Lenovo Vibe P1

Lenovo's Vibe P1 has one feature that will absolutely destroy what you thought was possible for a £160 phone: a 4,900 mAh battery. That's not a typo, the Vibe P1 has a battery that's double the size of many other smartphone batteries right now.

But that's not all – the Vibe P1 also delivers super fast-charging technology to get that monster battery charged pronto, as well as a fingerprint scanner, 5.5-inch Full HD display and Android Lollipop. Did we mention this thing only costs $160?
lenovo vibe p1

How do I get one of these phones?

Where there's a will, there's a way. In our device reviews, we always provide info on the best price for a device and share links for where you can buy one (just make sure you check the phone's LTE frequencies to ensure they will work with your carrier before you buy).

There is also a bunch of excellent online retailers in China willing to ship a device globally. So what do you think of these amazing devices ? worth buying ? Let us know in the comments.

How to find out if an app is using too much battery

The battery life of our Android phones is one of our biggest concerns. We want to use our smartphones throughout the day without charging and we often take drastic steps to achieve this. But the culprit of excess battery consumption could be an application – like Pokémon Go. Because it's not always easy to identify these battery-draining apps, this article explains the best way to detect them and what to do once you have.

Detecting a problematic app

Occasionally, applications that we consider useful or that we use frequently during the day, consume too much battery. Maybe you have a high-end device and this does not alter its performance, or goes unnoticed. But given that smartphone batteries decrease in effectiveness over time, efforts to reduce battery consumption will pay off in the long run.

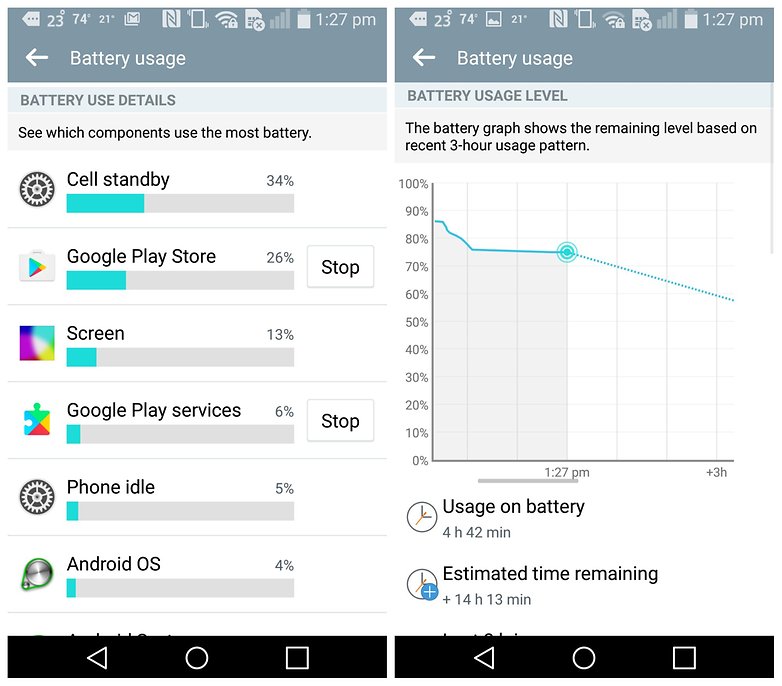
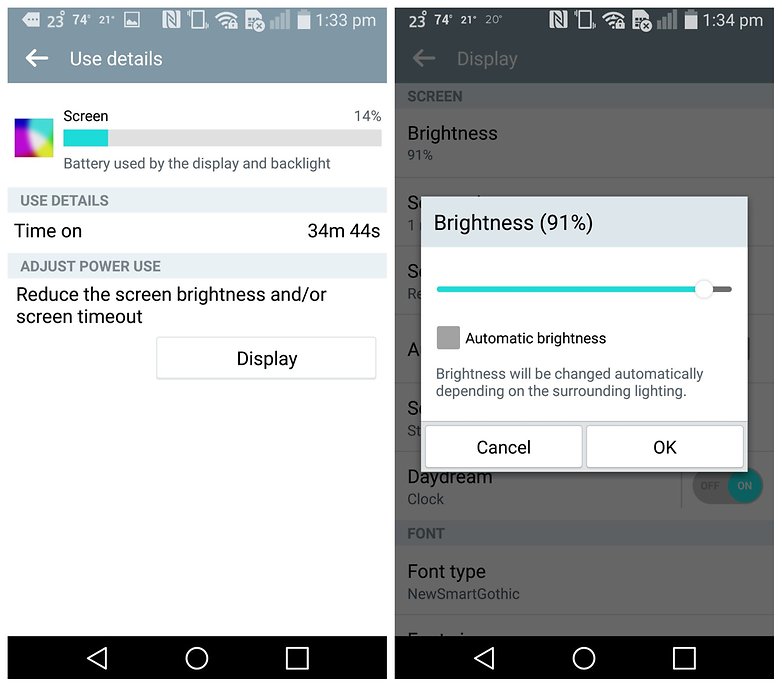
To discover which apps are consuming most battery, go to your Android Settings menu and hit Power Management (or just Battery, depending on your device) and you will see a list of apps and features.
battery saver

What to do after detecting battery drainer

Once you've found an application which consumes a lot of battery, you can decide what to do with it. Go to Settings hit Applications, find the app in question and tap it. You can opt for a less aggressive solution like deleting some of the data or clearing the cache of the app to solve the problem. But often the most effective solution is to force-stop the app and restart it. After you've done this, monitor the application like a policeman stalking a suspect.

Alternatively, you may be fed up with the application and seek a lighter, more stable equivalent in Google Play. Or you may simply decide that you don't want to use it anymore. In any case, from the same app screen you can uninstall the app and be safe in the knowledge that it won't be consuming any more battery unnecessarily.

What if an app is not responsible?

It often happens that it's not a specific application that's draining your battery, but rather is another smartphone function. If it's the screen, the solution is simple: set it to a lower brightness level. You won't always need it to be bright enough to see in sunlight. Also, consider shortening the length of time it stays active for.
brightness
It's normal for the screen to be at the top of the list of functions that are draining battery. But if you see an excessive percentage, heed the advice I've given above. I cannot give you a precise percentage you should consider alarming because it depends on your own usage. Just try to adjust the screen brightness according to the situation.

Hopefully, the tips above will help you get through the day without having to charge your device. Do you have problems battery-draining apps? How did you solve it? Let me know in the comments.

5 Easy Ways to Prevent Android Malware

Malware is a malicious software that is designed to damage or disrupt the system of your computer or mobile device. They include virus, spyware, Trojan horses and more. Once the malware enters the mobile phones, it can perform a variety of unwanted activities like stealing your important data or contact list, disrupt the operation of your phone, and even steal your money by making unwanted calls or sending SMS messages.

Among the mobile phones malware attacks, Android is the most targeted mobile operating system by malware developers and hackers. Fortunately, there are several steps that you can take to prevent the malware from infiltrating your Android device.

         1. Don’t install apps from unknown sources unless you are sure it is safe
Many apps from unknown sources contain malware that once installed can steal information and cause harm to your device. So never download and install apps from outside of Google play and Amazon App store for Android unless you’re sure that the site is safe for download.

         2. Check the reviews and ratings of the app by other users
Before downloading an app, read the reviews from other users as people will give a negative review and low rating if the app contains malware.

         3. Understand app permissions before accepting them
Permissions are a key to any mobile application. These permissions are crucial to the overall security of your system. If any of the permissions seem a little odd, such as a wallpaper app wanting to make phone calls or send SMS messages, then it’s best to not install the app.

         4. Install an Antivirus app on your device
Make sure that you have an antivirus app installed on your Android device. The tools can detect potential phishing websites, provides information about the kind of permissions other apps are requesting, and have anti-loss tool that can help to locate your lost or stolen device.

         5. Don’t root the device
Rooting an Android device does has some advantages. However, this break the security model and allowing all apps, including malicious app, to access the data owned by other applications.

4 Things You Must Do Before Selling Your Old Android Device

Are you about to sell your old Android device so you can get a new high-end smartphone? If the answer is Yes, then it’s important to take certain precautions before you hand over your old phone to its new owner. You need to ensure that you have no important data left on the device so that the buyer could not misuse it and you have a copy of all your important data that is on that device.

So if you’re about to pull the trigger on selling your Android phone or tablet, here are few simple steps you should take before selling your Android device to make sure that none of that bad thing happens to you.

Backup All Your Phone Data

The first thing you should do before selling your smartphone is to back it up. Sure, you don’t want to lose some important data that you had on your old handset. You may copy all your data to your PC by connecting it through a USB cable or you may upload all the files to a cloud service like Dropbox, Google+, and OneDrive.

The easiest way to back up your Android phone data is to use your Google Drive account. You can back up everything like photos, app data, bookmarks, calendar, contacts, and even your Wi-Fi network settings. To do it, head to Settings > Accounts > Google account and select all the data you want to sync for backup.

Factory Reset

After backing up all the important data, you need to wipe them off. This to prevent its new owner from getting your important data. Factory resetting your device will erase all data on your phone, including photos, music, documents, installed apps, contacts, calendar, and messages. To do this, go to Settings > Backup & reset > Factory data reset.

Remove Memory Card

Don’t forget to remove your memory card. You’re probably going to want to continue using it on your new device. If you do plan to give away your microSD card, be sure to back up the contents and thoroughly wipe the card. You can erase your SD card by navigating to Settings > Storage, then tap ‘Format SD card’.

Clean It

This is a small thing, but it’s quite important. Cleaning your device can help you sell your device at a better price. Wiping of the screen, removing any dust, and cleaning inside the ports are great ways to keep your device clean and looking brand new.

How about you? what do you do when you're about to sell your smartphone ? share it with us in the comments.

Two Easy Ways to Block Unwanted Calls on Your Android Phone

Unwanted telemarketing calls can be both frustrating and annoying, particularly when they interrupt your sleep, dinner, or time with your family or friends.

If you’ve ever been annoyed by those telemarketers or other unwanted callers, then you can simply block their phone numbers so that they can not call you again. Here’s I will show you two different ways to block unwanted calls on your Android phone.

Method #1: Use the built-in call blocking feature on your android phone

Most android phones come with this feature, but the procedure may differ according to the device manufacture and the version of android that you are using. In this example, I’m using Samsung Galaxy S3 to do the trick.

Open the phone app, tap the menu button and navigate to Call settings -> Call rejection -> Auto reject list. You can check the ‘Unknown’ option to automatically reject all calls from ‘Unknown’ numbers or tap on ‘Create’ to add individual phone numbers that you want to block permanently from your phone.

Method #2: Use a Call blocking app

If your android phone does not has an built-in call blocking feature and you really want to block calls, then you can use call blocking apps that are available in Google Play store.

Mr. Number is one of the best call blocking apps that allow you block unwanted calls from any phone numbers. Not just calls but Mr. Number also allows you to block text messages. You also can reverse lookup numbers so that you can get information about the caller.

If you have another ways to block calls, please share with us by leaving a comment below.

What is NFC and why should I use it?


NFC is something you may often hear mentioned with regard to new smartphones, but it's something which few people have an understanding of, or even use. Yes, it’s an acronym, but not all acronyms have to be scary. NFC is both easy to understand and can be incredibly useful. Here’s all you need to know about what NFC is and why you should use it.
AndroidPIT best ways to use nfc 5


What is NFC?

NFC stands for Near Field Communication. Essentially, it's a way for your phone to interact with something in close proximity. It operates within a radius of about 4 cm and provides a wireless connection between your device and another. This allows for two-way communication, with both devices involved being able to send and receive information. This NFC connection does not rely on Wi-Fi, 3G, LTE, or otherwise, and it does not cost anything to use.

How do I know if my Android smartphone has NFC?

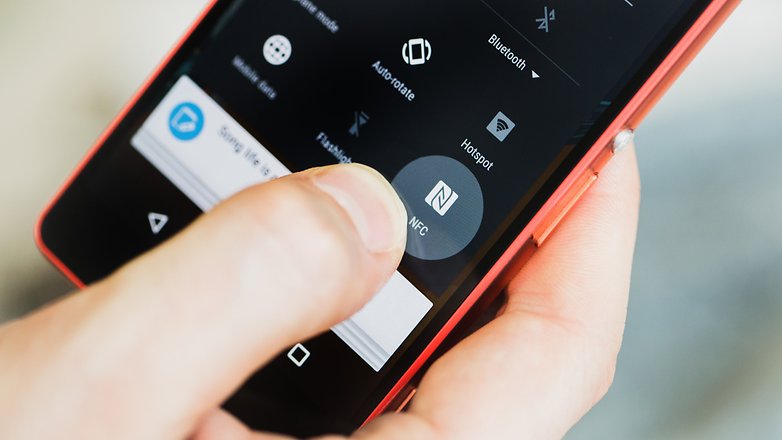
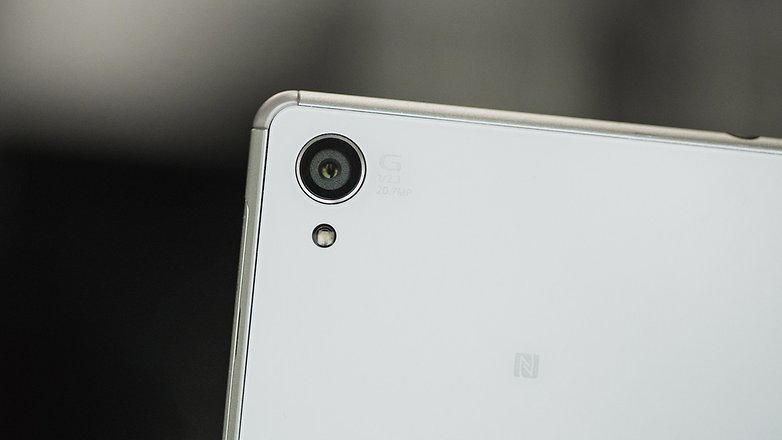
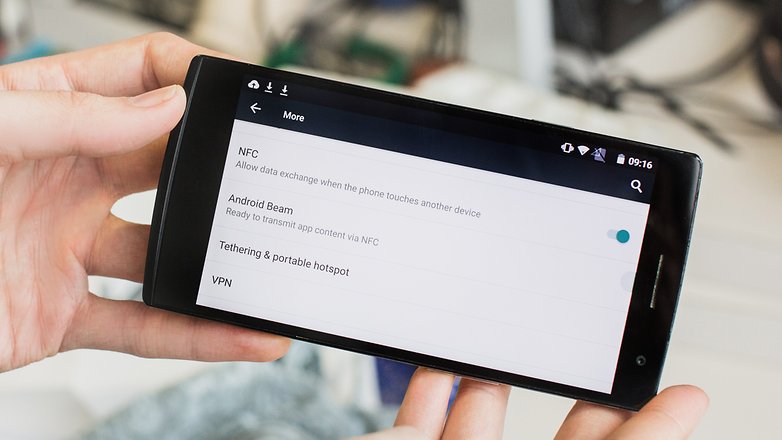
It's very simple. Just open Settings > More and see if there's an NFC option hiding there. Most smartphones that have NFC place a small NFC logo on their rear panels, too.
androidpit sony xperia Z3 9

How does NFC work on Android?

NFC transmits or receives data via radio waves. It's an established standard of wireless communication, so if devices stick to the NFC protocols, they can communicate with each other. It differs from Bluetooth in that it functions through electromagnetic induction. What this means is that there can be a passive device, such as a poster or sticker, requiring no power source of its own, that can transmit data when an active device, like your smartphone, comes into contact with it.

As an active NFC device, a smartphone can send and receive data over NFC. It encompasses the full range, three modes, of NFC:

  1. Reader/writer (e.g., for reading tags in NFC posters)
  2. Card emulation (e.g., for making payments)
  3. Peer-to-peer (e.g., for file transfers)

What can I use NFC for?

  • Connecting with NFC tags

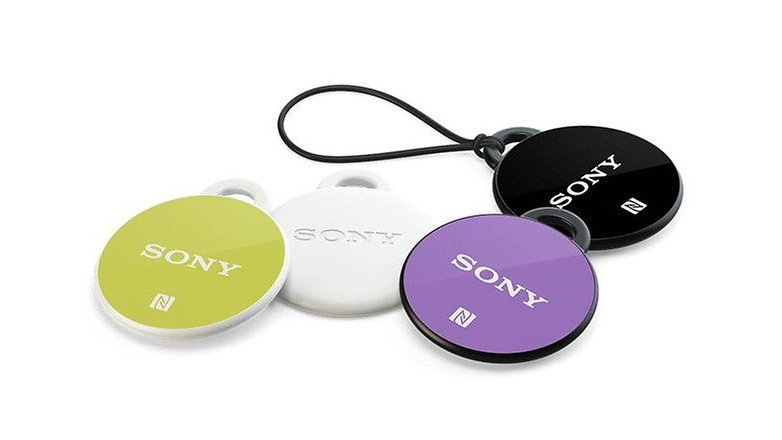
NFC tags are small physical “tags” or “stickers” containing NFC chips that can be programmed to provide any kind of information to your smartphone. Typically, an NFC tag contains links to a web address, but it can also be set to perform certain actions with your smartphone, like turn on the Wi-Fi, or turn down the ringer.

In the future, these tags could be embedded into just about anything. For example, an NFC tag could be used in a restaurant menu to make the most up-to-date version of it available immediately on your phone. All you would need to do is bring your smartphone into proximity with the physical menu, and you could potentially browse more detailed information of certain menu items, like nutritional values or ingredients. Where NFC presents an advantage over current QR technology is that there is no need for a “scanner app”: the information is available instantaneously.
SmartTags NT3 sony w628

  • Making payments with NFC

What will possibly become the biggest use for NFC in the near (field) future is the Tap and Pay option it provides. NFC payments are already available in many stores across the US, and in the UK for purchases of £15 or less, using an app like Softcard or Google Wallet: all it involves is tapping your phone against an enabled terminal. Now that Apple has included an NFC antenna in the iPhone 6 to work in conjunction with its new Apple Pay feature (and now includes similar functionality in the Apple Watch), these type of cardless wireless payments are going to become more and more prevalent.

This function of the chip can also be used as a method of identification, e.g., when entering a members-only building, going to a gig, or getting on public transportation.

  • Using NFC for file transfer 

Through NFC connectivity you can also send certain files between devices using Android Beam. This also enables you to share links to applications, as well as music, a location on Google Maps and contacts. It also allows you to pair your smartphone with a smartwatch or compatible speaker.
AndroidPIT best ways to use nfc 3

How to send files via NFC on Android

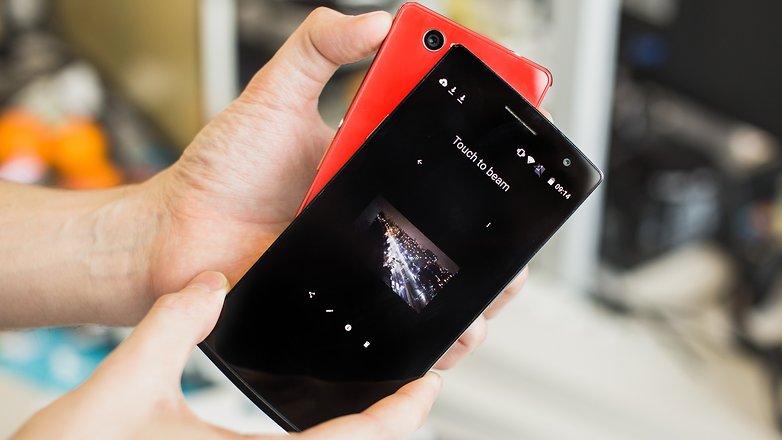
First you need to enable NFC and Android Beam on both devices (Settings > More), then all you need to do is go to the file you wish to send, say, a photo, and tap the devices together. That’s right, you don’t even need to select any “send via” options, just put the devices back to back, and when it asks to confirm the transfer hit "touch to beam". You can also do this with the help of a dedicated app such as File Beam, and the result is a much simpler and faster way of sending files between two neighboring handsets.AndroidPIT best ways to use nfc 4
There you have it. NFC provides the quickest way to set up connections between electronic devices and provides the fastest solution for file transfer between handsets in close proximity.

Some problems with NFC on Android

Not all devices bear an NFC chip, but they are becoming more common
NFC chips are not all located in the same place, resulting in some exploratory rubbing between devices
Cross-compatibility between devices is not universal, especially when it comes to specific file types.


Do you use NFC on your smartphone? What uses have you found for it?

5 Ways to Improve Your Battery Life While Playing Pokemon Go on Android

Pokemon GO is a phenomenon that has lured hordes of players out of their houses to capture, battle and train the cartoon characters in real-world environments. This app uses your phone’s GPS to detect where your location in the game, allowing you to catch Pokemon through your phone’s screen, which appears around you in the real world.

Since it requires you to always have the screen on, along with the GPS tracking and data enabled, it ends up being a huge drain on your battery. Niantic Developers is aware of the issues and they’re looking for solutions, but in the meantime, here are the best ways to extend battery life on your Android device and allow you to enjoy Pokemon Go for hours.

1. Enable Battery Safe Mode

This game has a built-in Battery Saver mode that is designed to dim your screen and slow the refresh rate while you’re walking. It works really well as long as you remember to use it. When this mode is enabled, the game will dim your phone’s screen when you point the top of your phone towards the ground (e.g. like you would do when holding the phone down at your side while walking) and you will get vibration notifications when a Pokemon pops up on screen for you to catch.

To enable Battery Saver, tap ‘Poke Ball’ at the bottom of the screen, then go to ‘Settings’ in the upper right corner and turn on ‘Battery Saver’.pokemon go battery saver

2. Turn Off Augmented Reality (AR) Feature

The Augmented Reality (AR) that lets you see a Pokemon on the sidewalk in front of you is really cool, but if you want to save battery life and catch Pokemon a little easier, it’s better to just turn this feature off.

You can turn off AR by hitting the AR switch in the upper right corner of the screen when you encounter a Pokemon.

3. Reduce Screen Brightness

This is one of the best ways to save battery life in general, not only for playing Pokemon Go. The only downside is turning down the brightness may make it harder to see what’s happening on the screen, especially if you’re playing outside in direct sunlight.

On Android, you can pull down the Quick Settings by swiping down from the top menu bar with two fingers and then adjusting the brightness slider or by going to Settings > Display > Brightness level and adjusting from there.

4. Turn Off Music and Sound Effects

You can also conserve power by turning off all the music and sound effects. These things eat up a little bit of battery life that adds up over the course of a play session. To turn them off, tap the ‘Poke Ball’ and go to the ‘Settings’ menu then uncheck ‘Music’ and ‘Sound Effects’.

5. Get a Battery Pack

If you’re often going out and hunting down Pokemon for hours, then investing in a portable battery pack might be your best bet. It can make sure that your phone doesn’t die just as you are about to capture the Pokemon you’ve been hunting for hours. This may be the easiest way to ensure that you can get hours of fun out of the app before being forced to head back to home and recharge your phone. All battery packs are not made equal, so be sure to do your homework before purchasing one.

Do you have any suggestions of how you save your battery life while playing Pokemon Go ? Share it in the comments :).

9 Reasons Why You Should Buy an Android Phone Instead of an Iphone

There are a wide variety of smart phones out there today, but the Android and iPhone are the two most popular operating systems for mobile devices by far, accounting for more than 90% of smartphone OS market.
While both phones offer a lot of great features, but there are plenty of reasons to get an Android phone instead of an Iphone.
In this article, I’ve listed down 9 reasons why you should buy an Android phone instead of an Iphone or other OS smartphone.

More Free Apps and Games

This probably the best reasons why you should buy an android phone. While both Apple and Google play store has over 700,000 different applications that you can be downloaded from your device. But you get more free apps and games in the Android market than you get in the Apple App store. For example, angry bird games which are sold for $0.99 each in the apple app store, but you can get it for free in the Google play store.

Easy Customization

Android phones give you a ton of options for customization. You can change the default settings for almost anything. Moreover all mobile applications that are downloaded from Android market are compatible with Android handsets making it easy to customize.

Open Source Platform

The best thing about Android is that it’s an Open Source operating system. This gives larger support for developers on cultivating and expanding for their platform. Moreover this gives users the freedom to contribute their own ideas and even applications, without worrying about the license issues that may be jammed them in the future.

Connected with Google Products

Since Android is owned by Google, the OS connected with all the Google products, including Gmail, Google Docs, Google Maps, Google+ and etc. All the necessary data and settings of Google services, such as Google Talk, Google Picasa, Gmail, etc, will automatically be copied to your device. All of these also give users access to a variety of applications that they can use between phone and PC.

The Flexibility of Widgets

Another best thing about Android is that you can easily put widgets on your home screen which allows you to quickly access to the apps on your phone and see all of the information you want at a glance on your home screen without having to fire up an app. On iPhone, you are unable to place widgets on home screen to place widgets, though the iPhone’s default screen is the app drawer.

Many Vendors support

Unlike other mobile OS such as IOS and symbian that is controlled by their makers – IOS by Apple and Symbian by Nokia – Android has a wide range of big manufactures support like Samsung, Sony, HTC, and LG. Even computer vendor such as Acer and Dell have roped to launch Android-based devices. The biggest advantage for users is that they have a wide selection to choose from.

Custom Launchers

If you don’t like the launcher that come with Android phone, you can easily replace it with other launchers. You can try out a wide variety of custom launcher apps in the play store and tweak everything from your home screen layout to your page transitions and even gestures. There’s no risk involved with launcher apps and you can really open up a world of possibilities.

Custom ROMs

You can custom the stock ROM that came with your android device if you want to. This essential to boost your phone’s performance or to gain access to some add-ons or tools. This is definitely the extreme end of Android customization but you need to exercise a little to ensure that you don’t run into trouble.

Affordable Prices

The most favorable thing for the users is that to buy an Android product you do not have to care about your budget. They come in a variety of price ranging from around $70 to as high as $1000. So no matter how your financial situation is, you’ll be sure to found the phone that fit your needs. On top of that, Android actually provides you much more options and features to fit in with your budget.

What do you think is better, Android phone or Iphone ? comment down below which one do you prefer.

Monday, August 1, 2016

How to make the Android font look like your own handwriting

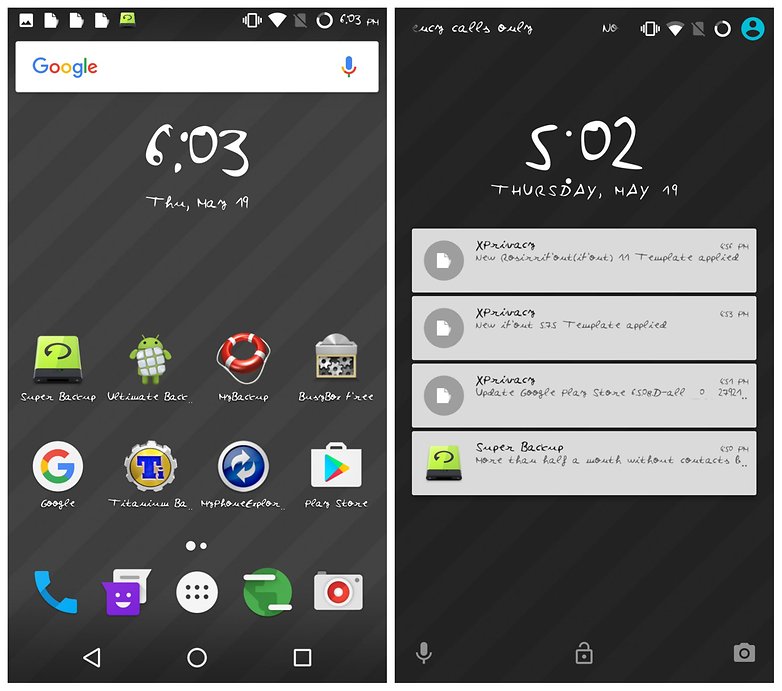
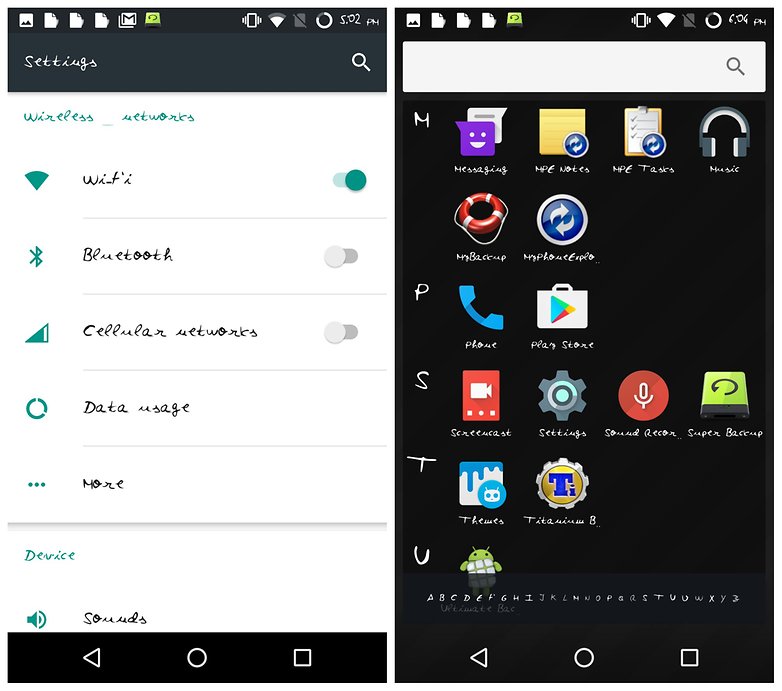
This is the reason I love Android. Did you know that you can use your own handwriting for all Android menus, app names and even WhatsApp conversations? Find a printer and a black marker pen and get ready to make your Android even more personal.

Before we begin, you should know that changing every individual character on your Android device isn't something that people do every day and, in order to do so, some privileges are required. The system font is stored within the device's system files and to modify these, you must have root permissions.

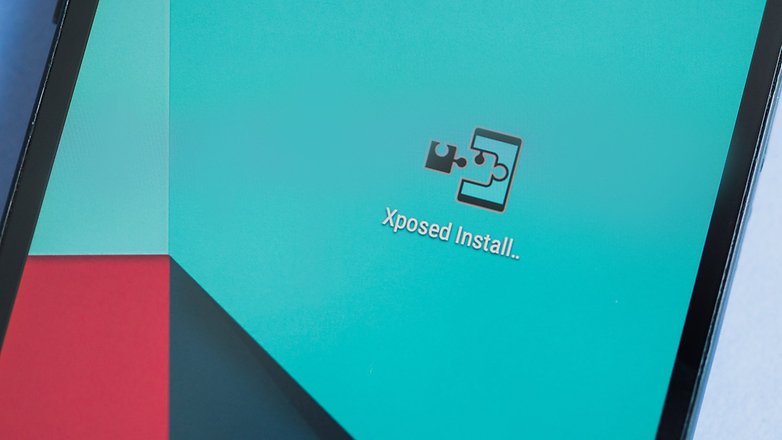
Further, you must have Xposed Framework installed on your handset to make use of the particular module that lets you achieve this awesome trick. AndroidPIT xposed framework modules 4267

How to digitize your handwriting

For Android to use your own handwriting as a font, you must first give it a reference point. To do this you can use an online tool called My Script Font. Go to the website and download the template – it's available in PDF or PNG formats.

Carefully fill in the template but avoid following the guidelines shown in each box. Instead, try to write each letter true to how you normally would in your everyday life.

It's best to use a fine-tipped black marker pen because it offers both visibility and versatility (the boxes are quite small, so thicker pens can be unwieldy). If you want a great finish, try using a pencil first and then go over it again with pen.

Make sure you do not leave the box or your letters won't appear correctly when they later arrive on your Android phone.
AndroidPit IFont tipografia 02
Once you have all of your beautifully shaped letters filled out, scan the document at a decent resolution (between 300 and 600 dpi should be fine). You can even scan with your smartphone using an app like Tiny Scanner.

After you've saved the image file, navigate back to My Script Font to upload it. Give it a suitable name and hit start. When it's finished processing you will see a sample of the text; below will be a link to the download file which looks like <your filename>.ttf. Download it to your smartphone in a memorable location.

How to change the font of your smartphone

To change your Android system font you need to first install the iFont (Expert of Fonts) module with the Xposed Installer app. You may be asked for a number of permissions when you install it, but if you want to make use of this feature, you'll have to accept them.

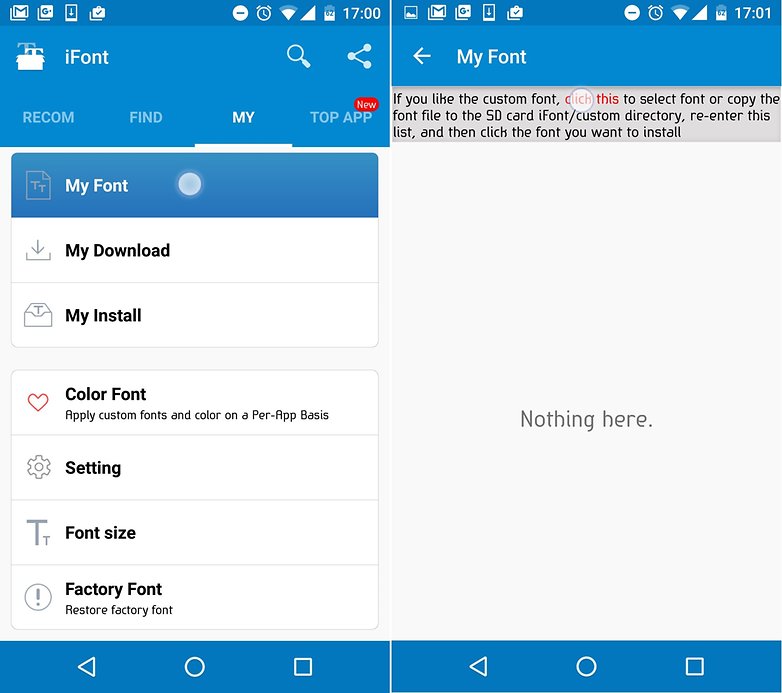
Before changing your Android font, you may wish to make a backup copy of the original system typeface. Do this in the iFont module at My > Factory Font > Backup font section.
AndroidPit IFont tipografia 01
Now, enter the iFont module and navigate to My > My Font. As indicated in the image above right, tap the red 'click this' area on the following page. Now navigate to the location of the .ttf file you saved earlier. Select it, and when it's loaded, tap 'Set'.

Your device may restart and afterward your smartphone will show text in your own handwriting. Really.

As a final measure, go to Settings > Display > Font Size and increase or decrease it to suit your personal taste.
androidpit android handwriting
androidpit android handwriting 2
You can also use other .ttf files to customize your Android font, they don't have to be your own. Just follow the same steps above with a font.

Have you always wanted your own handwriting on your smartphone? Are you going to give this a try? Let us know in the comments. 
Android Marshmallow tips and tricks: 10 you should try

Android Marshmallow is spreading to more devices by the week. As some of its improvements may go unnoticed, we've put together a few Android Marshmallow tips and tricks to help you get the most from the new software. There's even a guide to enabling multi-window mode, which was left out of the final build, and how to get Marshmallow features on old devices.
AndroidPIT android 6 0 marshmallow 1 2

1. Grant app permissions individually

Granular app permissions was the holy grail of the Android Marshmallow release. We all hoped it would pan out but no one really believed it would. We had always been told that denying specific app permissions within a third-party app could break it.

Now, however, Android lets you manage app permissions individually, without developers having had to do anything, and everything seems to work swimmingly.
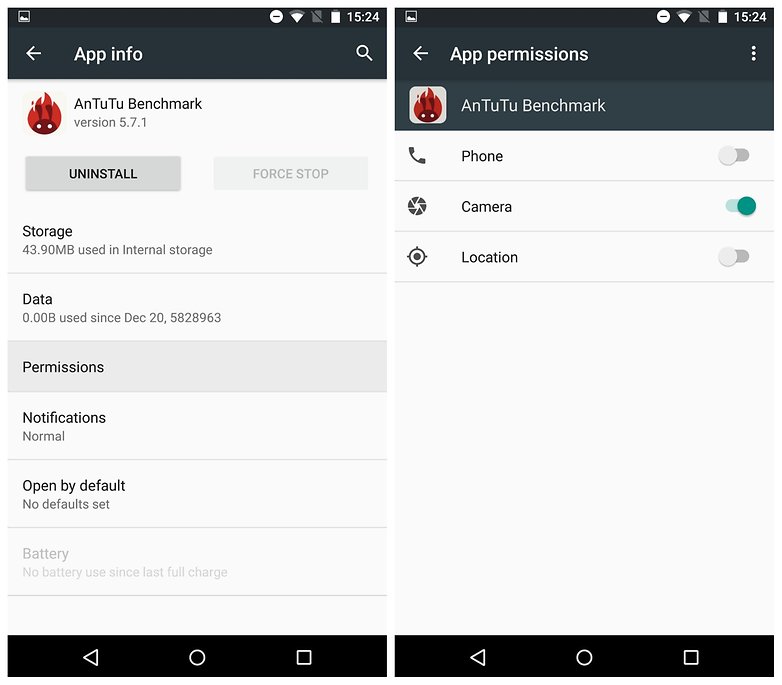
AndroidPIT Android M preview AnTuTu permissions
To access app permissions, go to Settings > Apps and tap an individual app to see its permissions. Then simply flip the switch for the permissions you do or don't want to grant it.

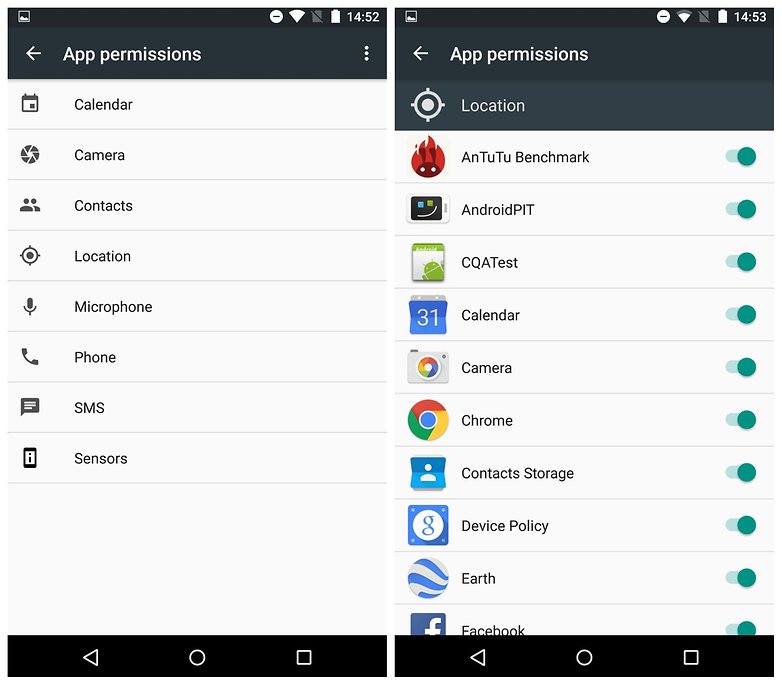
You can also view a list of permissions to see which have been granted to which apps. Just go to Settings > Apps, then tap the overflow menu in the top right corner and go to Advanced > App Permissions.
AndroidPIT Android M preview app permissions location

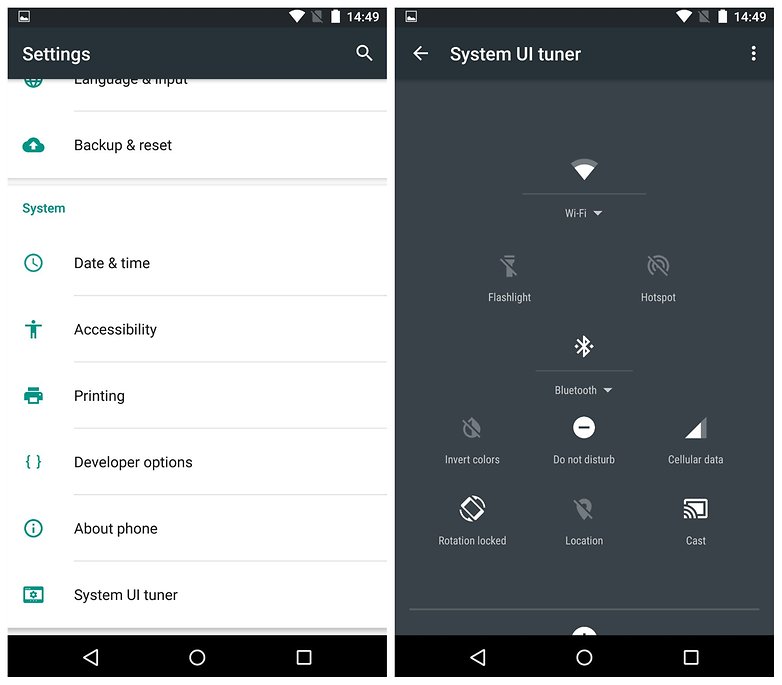
2. Customize Quick Settings using System UI Tuner

To enable the System UI Tuner, bring down your Quick Settings menu (swipe down from the top of your phone with two fingers) and tap and hold the settings button (cog wheel) for five seconds. When you let go you will be asked if you would like to enable System UI Tuner. Select yes and you'll see System UI Tuner at the bottom of your Settings list.
AndroidPIT Android M preview system ui tuner
In System UI Tuner, tap Quick Settings and you'll see a mockup of your Quick Settings shade. You can add tiles (press the + at the bottom), move the toggles around (tap and drag) or delete toggles (tap and drag to the bottom). Your changes will be reflected in the Quick Settings menu.

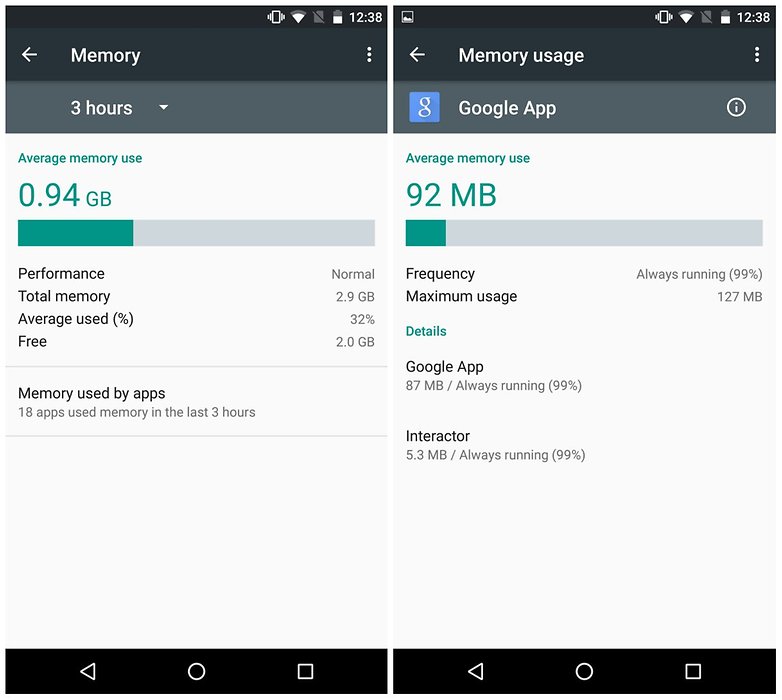
3. Get to know RAM Manager

Android Marshmallow is all about giving us even more power over our beloved Androids, and RAM is a huge part of that. Go to Settings > Memory > Memory used by apps, to see a list of all your memory-hogging apps.
androidpit ram manager android marshmallow
Tapping an entry will show you detailed info and give you the option to force stop the app if necessary. Take some time to familiarize yourself with this part of your Android – it's a great tool to help you understand what RAM usage is normal and what's out of the ordinary.

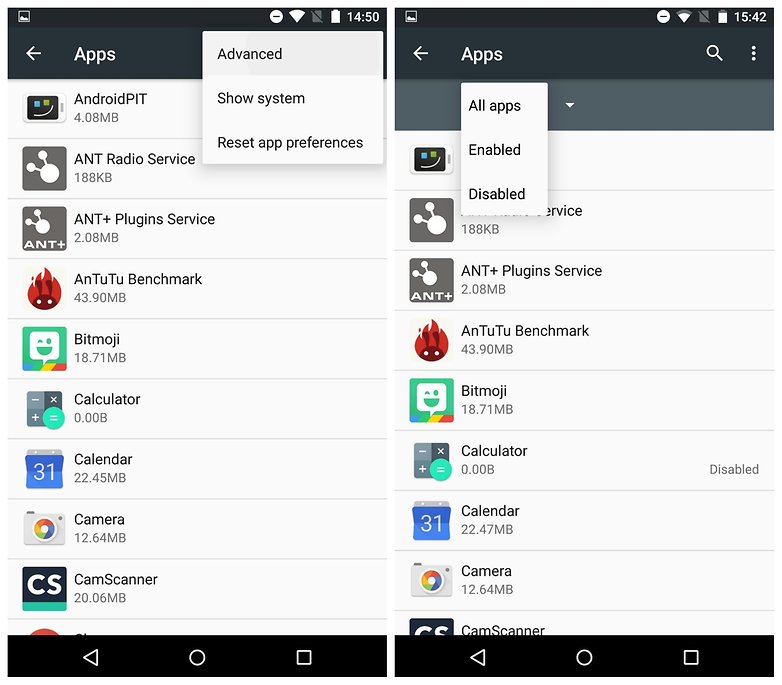
4. Find your Downloaded, Running, All and Disabled app tabs

The RAM Manager is also effectively the new home for the 'Running' tab that was in previous versions of the Settings > Apps section. Unlike previous Android versions, Android Marshmallow doesn't break your apps list down into tabs for 'Downloaded', 'Running', 'All' and 'Disabled'.
AndroidPIT Android M preview all apps tab disabled enabled
The 'Running' tab now appears as RAM Manager; 'All' and 'Disabled' are now options in a drop-down menu, accessible once you've disabled at least one app. The default view in Settings > Apps is the 'All' apps tab. We'll have to wait and see how devices with SD cards display the information that was previously found in the 'SD Card' tab.

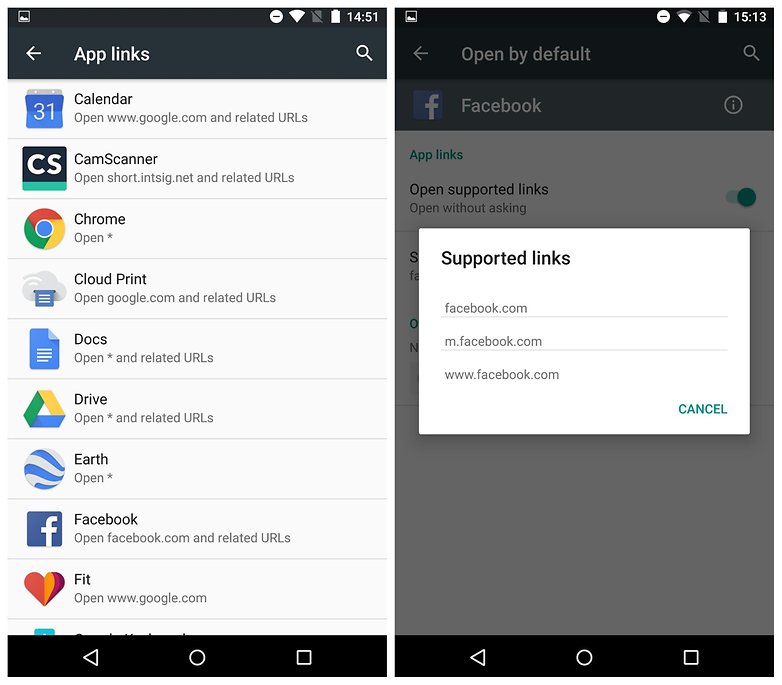
5. Automatically associate links

Android Marshmallow allows you to automatically associate specific apps with specific types of links. So if someone emails you a Twitter link, for example, you can set Twitter as the default app for opening such links, rather than picking from a list every time.

Although you could set certain apps as default apps before, the system didn't work all that well. Now you can associate specific domain URLs with an app of your choice. For example, all facebook.com links can be set to open either in Facebook, Tinfoil or another third-party Facebook app automatically.
AndroidPIT Android M preview app links open by default facebook
To do this, go to Settings > Apps, then tap the overflow menu at the top right and go to Advanced > App Links, then flip the switch for the apps that you want to set to automatically intercept links from specific domains.

6. Activate Google Now from the lock screen

You might have missed this one, but the lock screen shortcut to the dialer has been replaced by Google Now. This is a welcome change; you can use Google Now to call someone just by speaking (along with plenty of other things), so you haven't lost out on functionality by losing the dialer shortcut.

Simply swipe from the bottom left-hand corner of the lock screen to get Google Now ready to receive your voice command.

7. Enjoy Google Now on Tap

Google Now on Tap is easily my favorite feature in Android Marshmallow. It brings Google Now functionality to every part of your phone or tablet.

There's no need to switch apps or copy and paste phrases anymore – once it's enabled, you can bring up Google Now on Tap from any app, simply by selecting text and long-pressing the Home button.

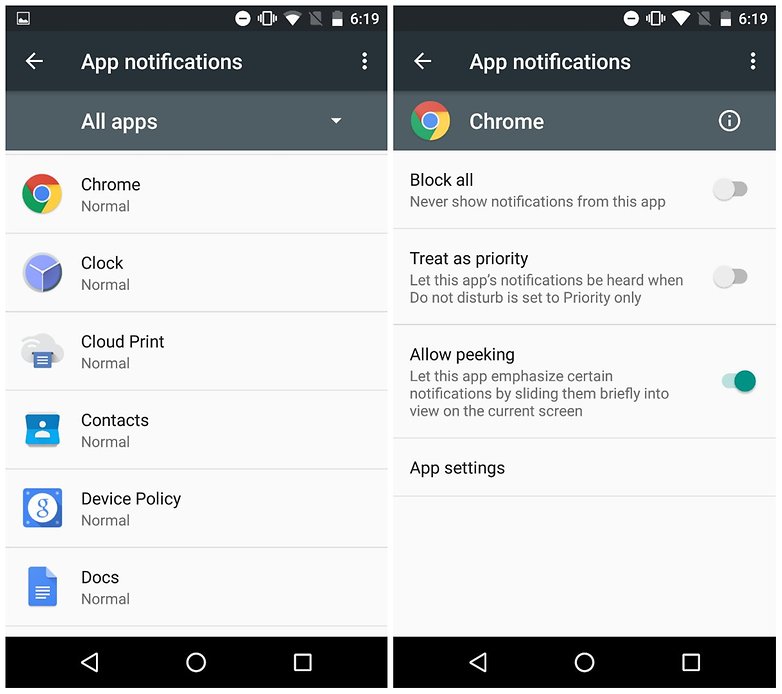
8. Disable notification peeking 

Heads-up notifications, or 'peeking' as it is now referred to, is the feature that allows notifications to pop up over the top of your display. It was introduced in Android Lollipop, but since app developers now tend to enable peeking by default, Android Marshmallow gives you the power to decide if you want to allow it or not.
androidpit app notifications marshmallow peek
If these types of notifications bother you, you can go into Settings > Sound & Notifications > App Notifications, then select the app they're coming from, and switch off Allow peeking.

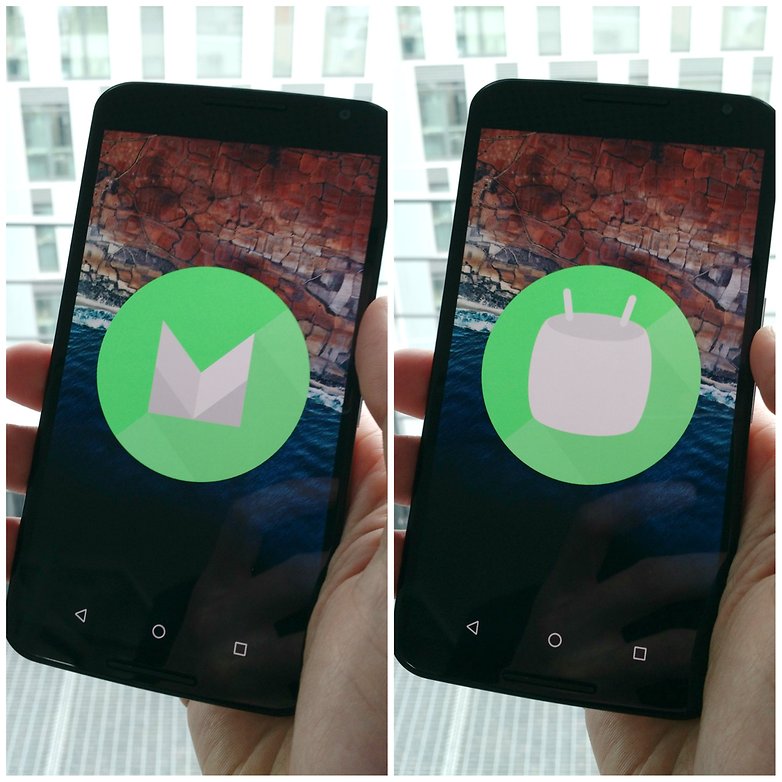
9. Check out the Android Marshmallow Easter Egg

The Android Easter Egg is one of the most pointless but fun parts of any new Android version. You simply go to Settings > About Phone and repeatedly tap the Version Number to find it. In Lollipop you'd see a giant lollipop, and if you long-pressed it, you'd be taken to a Flappy Bird clone.
android marshmallow easter egg
In Marshmallow, tapping the version number, reveals a graphic of the letter M. When you tap it again, you get a marshmallow with android antenna.

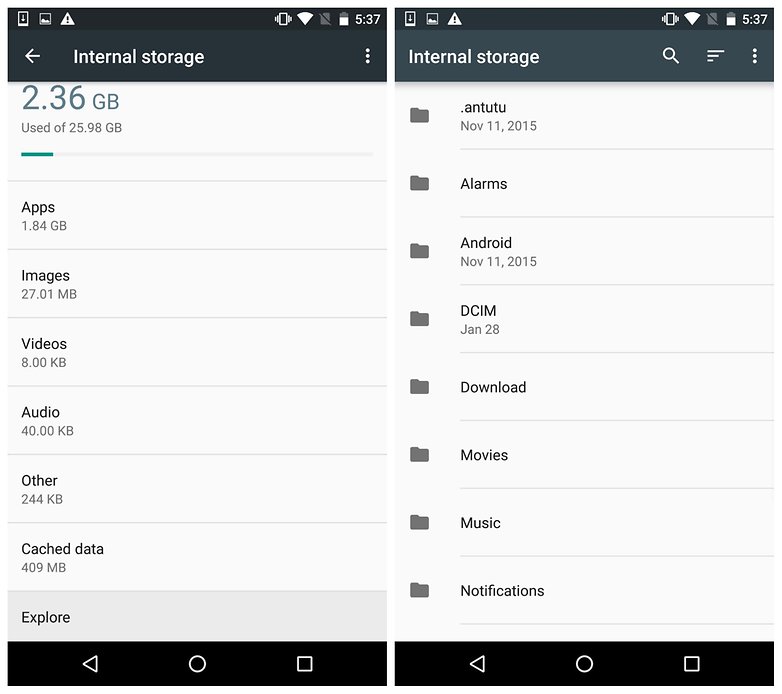
10. Access the Marshmallow file manager

Did you know Android Marshmallow comes with its own built-in file explorer? Well it does. Go to Settings > Storage & USB > Explore to... er, explore it.
android marshmallow file explorer
Marshmallow's solution might not be as in-depth and feature packed as something like ES File Explorer, but it's also less intrusive. Check it out for a clean, minimal interface for browsing files.

Found any other hot Android Marshmallow tips and tricks you can share? What's your favorite? Let us know in the comments.
 

Copyright @ 2013 Android Master.