Friday, August 5, 2016

Two Easy Ways to Block Unwanted Calls on Your Android Phone

Unwanted telemarketing calls can be both frustrating and annoying, particularly when they interrupt your sleep, dinner, or time with your family or friends.

If you’ve ever been annoyed by those telemarketers or other unwanted callers, then you can simply block their phone numbers so that they can not call you again. Here’s I will show you two different ways to block unwanted calls on your Android phone.

Method #1: Use the built-in call blocking feature on your android phone

Most android phones come with this feature, but the procedure may differ according to the device manufacture and the version of android that you are using. In this example, I’m using Samsung Galaxy S3 to do the trick.

Open the phone app, tap the menu button and navigate to Call settings -> Call rejection -> Auto reject list. You can check the ‘Unknown’ option to automatically reject all calls from ‘Unknown’ numbers or tap on ‘Create’ to add individual phone numbers that you want to block permanently from your phone.

Method #2: Use a Call blocking app

If your android phone does not has an built-in call blocking feature and you really want to block calls, then you can use call blocking apps that are available in Google Play store.

Mr. Number is one of the best call blocking apps that allow you block unwanted calls from any phone numbers. Not just calls but Mr. Number also allows you to block text messages. You also can reverse lookup numbers so that you can get information about the caller.

If you have another ways to block calls, please share with us by leaving a comment below.

What is NFC and why should I use it?


NFC is something you may often hear mentioned with regard to new smartphones, but it's something which few people have an understanding of, or even use. Yes, it’s an acronym, but not all acronyms have to be scary. NFC is both easy to understand and can be incredibly useful. Here’s all you need to know about what NFC is and why you should use it.
AndroidPIT best ways to use nfc 5


What is NFC?

NFC stands for Near Field Communication. Essentially, it's a way for your phone to interact with something in close proximity. It operates within a radius of about 4 cm and provides a wireless connection between your device and another. This allows for two-way communication, with both devices involved being able to send and receive information. This NFC connection does not rely on Wi-Fi, 3G, LTE, or otherwise, and it does not cost anything to use.

How do I know if my Android smartphone has NFC?

It's very simple. Just open Settings > More and see if there's an NFC option hiding there. Most smartphones that have NFC place a small NFC logo on their rear panels, too.
androidpit sony xperia Z3 9

How does NFC work on Android?

NFC transmits or receives data via radio waves. It's an established standard of wireless communication, so if devices stick to the NFC protocols, they can communicate with each other. It differs from Bluetooth in that it functions through electromagnetic induction. What this means is that there can be a passive device, such as a poster or sticker, requiring no power source of its own, that can transmit data when an active device, like your smartphone, comes into contact with it.

As an active NFC device, a smartphone can send and receive data over NFC. It encompasses the full range, three modes, of NFC:

  1. Reader/writer (e.g., for reading tags in NFC posters)
  2. Card emulation (e.g., for making payments)
  3. Peer-to-peer (e.g., for file transfers)

What can I use NFC for?

  • Connecting with NFC tags

NFC tags are small physical “tags” or “stickers” containing NFC chips that can be programmed to provide any kind of information to your smartphone. Typically, an NFC tag contains links to a web address, but it can also be set to perform certain actions with your smartphone, like turn on the Wi-Fi, or turn down the ringer.

In the future, these tags could be embedded into just about anything. For example, an NFC tag could be used in a restaurant menu to make the most up-to-date version of it available immediately on your phone. All you would need to do is bring your smartphone into proximity with the physical menu, and you could potentially browse more detailed information of certain menu items, like nutritional values or ingredients. Where NFC presents an advantage over current QR technology is that there is no need for a “scanner app”: the information is available instantaneously.
SmartTags NT3 sony w628

  • Making payments with NFC

What will possibly become the biggest use for NFC in the near (field) future is the Tap and Pay option it provides. NFC payments are already available in many stores across the US, and in the UK for purchases of £15 or less, using an app like Softcard or Google Wallet: all it involves is tapping your phone against an enabled terminal. Now that Apple has included an NFC antenna in the iPhone 6 to work in conjunction with its new Apple Pay feature (and now includes similar functionality in the Apple Watch), these type of cardless wireless payments are going to become more and more prevalent.

This function of the chip can also be used as a method of identification, e.g., when entering a members-only building, going to a gig, or getting on public transportation.

  • Using NFC for file transfer 

Through NFC connectivity you can also send certain files between devices using Android Beam. This also enables you to share links to applications, as well as music, a location on Google Maps and contacts. It also allows you to pair your smartphone with a smartwatch or compatible speaker.
AndroidPIT best ways to use nfc 3

How to send files via NFC on Android

First you need to enable NFC and Android Beam on both devices (Settings > More), then all you need to do is go to the file you wish to send, say, a photo, and tap the devices together. That’s right, you don’t even need to select any “send via” options, just put the devices back to back, and when it asks to confirm the transfer hit "touch to beam". You can also do this with the help of a dedicated app such as File Beam, and the result is a much simpler and faster way of sending files between two neighboring handsets.AndroidPIT best ways to use nfc 4
There you have it. NFC provides the quickest way to set up connections between electronic devices and provides the fastest solution for file transfer between handsets in close proximity.

Some problems with NFC on Android

Not all devices bear an NFC chip, but they are becoming more common
NFC chips are not all located in the same place, resulting in some exploratory rubbing between devices
Cross-compatibility between devices is not universal, especially when it comes to specific file types.


Do you use NFC on your smartphone? What uses have you found for it?

5 Ways to Improve Your Battery Life While Playing Pokemon Go on Android

Pokemon GO is a phenomenon that has lured hordes of players out of their houses to capture, battle and train the cartoon characters in real-world environments. This app uses your phone’s GPS to detect where your location in the game, allowing you to catch Pokemon through your phone’s screen, which appears around you in the real world.

Since it requires you to always have the screen on, along with the GPS tracking and data enabled, it ends up being a huge drain on your battery. Niantic Developers is aware of the issues and they’re looking for solutions, but in the meantime, here are the best ways to extend battery life on your Android device and allow you to enjoy Pokemon Go for hours.

1. Enable Battery Safe Mode

This game has a built-in Battery Saver mode that is designed to dim your screen and slow the refresh rate while you’re walking. It works really well as long as you remember to use it. When this mode is enabled, the game will dim your phone’s screen when you point the top of your phone towards the ground (e.g. like you would do when holding the phone down at your side while walking) and you will get vibration notifications when a Pokemon pops up on screen for you to catch.

To enable Battery Saver, tap ‘Poke Ball’ at the bottom of the screen, then go to ‘Settings’ in the upper right corner and turn on ‘Battery Saver’.pokemon go battery saver

2. Turn Off Augmented Reality (AR) Feature

The Augmented Reality (AR) that lets you see a Pokemon on the sidewalk in front of you is really cool, but if you want to save battery life and catch Pokemon a little easier, it’s better to just turn this feature off.

You can turn off AR by hitting the AR switch in the upper right corner of the screen when you encounter a Pokemon.

3. Reduce Screen Brightness

This is one of the best ways to save battery life in general, not only for playing Pokemon Go. The only downside is turning down the brightness may make it harder to see what’s happening on the screen, especially if you’re playing outside in direct sunlight.

On Android, you can pull down the Quick Settings by swiping down from the top menu bar with two fingers and then adjusting the brightness slider or by going to Settings > Display > Brightness level and adjusting from there.

4. Turn Off Music and Sound Effects

You can also conserve power by turning off all the music and sound effects. These things eat up a little bit of battery life that adds up over the course of a play session. To turn them off, tap the ‘Poke Ball’ and go to the ‘Settings’ menu then uncheck ‘Music’ and ‘Sound Effects’.

5. Get a Battery Pack

If you’re often going out and hunting down Pokemon for hours, then investing in a portable battery pack might be your best bet. It can make sure that your phone doesn’t die just as you are about to capture the Pokemon you’ve been hunting for hours. This may be the easiest way to ensure that you can get hours of fun out of the app before being forced to head back to home and recharge your phone. All battery packs are not made equal, so be sure to do your homework before purchasing one.

Do you have any suggestions of how you save your battery life while playing Pokemon Go ? Share it in the comments :).

9 Reasons Why You Should Buy an Android Phone Instead of an Iphone

There are a wide variety of smart phones out there today, but the Android and iPhone are the two most popular operating systems for mobile devices by far, accounting for more than 90% of smartphone OS market.
While both phones offer a lot of great features, but there are plenty of reasons to get an Android phone instead of an Iphone.
In this article, I’ve listed down 9 reasons why you should buy an Android phone instead of an Iphone or other OS smartphone.

More Free Apps and Games

This probably the best reasons why you should buy an android phone. While both Apple and Google play store has over 700,000 different applications that you can be downloaded from your device. But you get more free apps and games in the Android market than you get in the Apple App store. For example, angry bird games which are sold for $0.99 each in the apple app store, but you can get it for free in the Google play store.

Easy Customization

Android phones give you a ton of options for customization. You can change the default settings for almost anything. Moreover all mobile applications that are downloaded from Android market are compatible with Android handsets making it easy to customize.

Open Source Platform

The best thing about Android is that it’s an Open Source operating system. This gives larger support for developers on cultivating and expanding for their platform. Moreover this gives users the freedom to contribute their own ideas and even applications, without worrying about the license issues that may be jammed them in the future.

Connected with Google Products

Since Android is owned by Google, the OS connected with all the Google products, including Gmail, Google Docs, Google Maps, Google+ and etc. All the necessary data and settings of Google services, such as Google Talk, Google Picasa, Gmail, etc, will automatically be copied to your device. All of these also give users access to a variety of applications that they can use between phone and PC.

The Flexibility of Widgets

Another best thing about Android is that you can easily put widgets on your home screen which allows you to quickly access to the apps on your phone and see all of the information you want at a glance on your home screen without having to fire up an app. On iPhone, you are unable to place widgets on home screen to place widgets, though the iPhone’s default screen is the app drawer.

Many Vendors support

Unlike other mobile OS such as IOS and symbian that is controlled by their makers – IOS by Apple and Symbian by Nokia – Android has a wide range of big manufactures support like Samsung, Sony, HTC, and LG. Even computer vendor such as Acer and Dell have roped to launch Android-based devices. The biggest advantage for users is that they have a wide selection to choose from.

Custom Launchers

If you don’t like the launcher that come with Android phone, you can easily replace it with other launchers. You can try out a wide variety of custom launcher apps in the play store and tweak everything from your home screen layout to your page transitions and even gestures. There’s no risk involved with launcher apps and you can really open up a world of possibilities.

Custom ROMs

You can custom the stock ROM that came with your android device if you want to. This essential to boost your phone’s performance or to gain access to some add-ons or tools. This is definitely the extreme end of Android customization but you need to exercise a little to ensure that you don’t run into trouble.

Affordable Prices

The most favorable thing for the users is that to buy an Android product you do not have to care about your budget. They come in a variety of price ranging from around $70 to as high as $1000. So no matter how your financial situation is, you’ll be sure to found the phone that fit your needs. On top of that, Android actually provides you much more options and features to fit in with your budget.

What do you think is better, Android phone or Iphone ? comment down below which one do you prefer.

Monday, August 1, 2016

How to make the Android font look like your own handwriting

This is the reason I love Android. Did you know that you can use your own handwriting for all Android menus, app names and even WhatsApp conversations? Find a printer and a black marker pen and get ready to make your Android even more personal.

Before we begin, you should know that changing every individual character on your Android device isn't something that people do every day and, in order to do so, some privileges are required. The system font is stored within the device's system files and to modify these, you must have root permissions.

Further, you must have Xposed Framework installed on your handset to make use of the particular module that lets you achieve this awesome trick. AndroidPIT xposed framework modules 4267

How to digitize your handwriting

For Android to use your own handwriting as a font, you must first give it a reference point. To do this you can use an online tool called My Script Font. Go to the website and download the template – it's available in PDF or PNG formats.

Carefully fill in the template but avoid following the guidelines shown in each box. Instead, try to write each letter true to how you normally would in your everyday life.

It's best to use a fine-tipped black marker pen because it offers both visibility and versatility (the boxes are quite small, so thicker pens can be unwieldy). If you want a great finish, try using a pencil first and then go over it again with pen.

Make sure you do not leave the box or your letters won't appear correctly when they later arrive on your Android phone.
AndroidPit IFont tipografia 02
Once you have all of your beautifully shaped letters filled out, scan the document at a decent resolution (between 300 and 600 dpi should be fine). You can even scan with your smartphone using an app like Tiny Scanner.

After you've saved the image file, navigate back to My Script Font to upload it. Give it a suitable name and hit start. When it's finished processing you will see a sample of the text; below will be a link to the download file which looks like <your filename>.ttf. Download it to your smartphone in a memorable location.

How to change the font of your smartphone

To change your Android system font you need to first install the iFont (Expert of Fonts) module with the Xposed Installer app. You may be asked for a number of permissions when you install it, but if you want to make use of this feature, you'll have to accept them.

Before changing your Android font, you may wish to make a backup copy of the original system typeface. Do this in the iFont module at My > Factory Font > Backup font section.
AndroidPit IFont tipografia 01
Now, enter the iFont module and navigate to My > My Font. As indicated in the image above right, tap the red 'click this' area on the following page. Now navigate to the location of the .ttf file you saved earlier. Select it, and when it's loaded, tap 'Set'.

Your device may restart and afterward your smartphone will show text in your own handwriting. Really.

As a final measure, go to Settings > Display > Font Size and increase or decrease it to suit your personal taste.
androidpit android handwriting
androidpit android handwriting 2
You can also use other .ttf files to customize your Android font, they don't have to be your own. Just follow the same steps above with a font.

Have you always wanted your own handwriting on your smartphone? Are you going to give this a try? Let us know in the comments. 

Android Marshmallow tips and tricks: 10 you should try

Android Marshmallow is spreading to more devices by the week. As some of its improvements may go unnoticed, we've put together a few Android Marshmallow tips and tricks to help you get the most from the new software. There's even a guide to enabling multi-window mode, which was left out of the final build, and how to get Marshmallow features on old devices.
AndroidPIT android 6 0 marshmallow 1 2

1. Grant app permissions individually

Granular app permissions was the holy grail of the Android Marshmallow release. We all hoped it would pan out but no one really believed it would. We had always been told that denying specific app permissions within a third-party app could break it.

Now, however, Android lets you manage app permissions individually, without developers having had to do anything, and everything seems to work swimmingly.
AndroidPIT Android M preview AnTuTu permissions
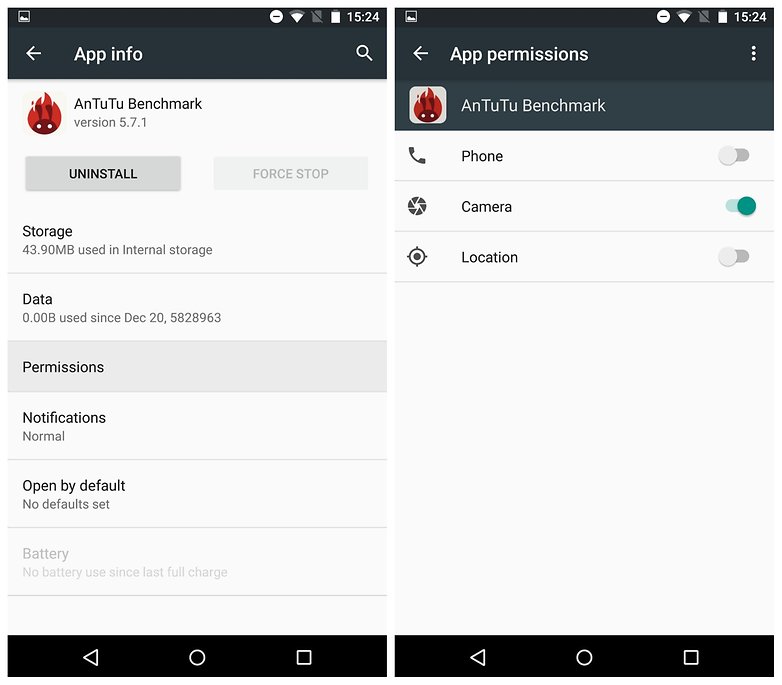
To access app permissions, go to Settings > Apps and tap an individual app to see its permissions. Then simply flip the switch for the permissions you do or don't want to grant it.

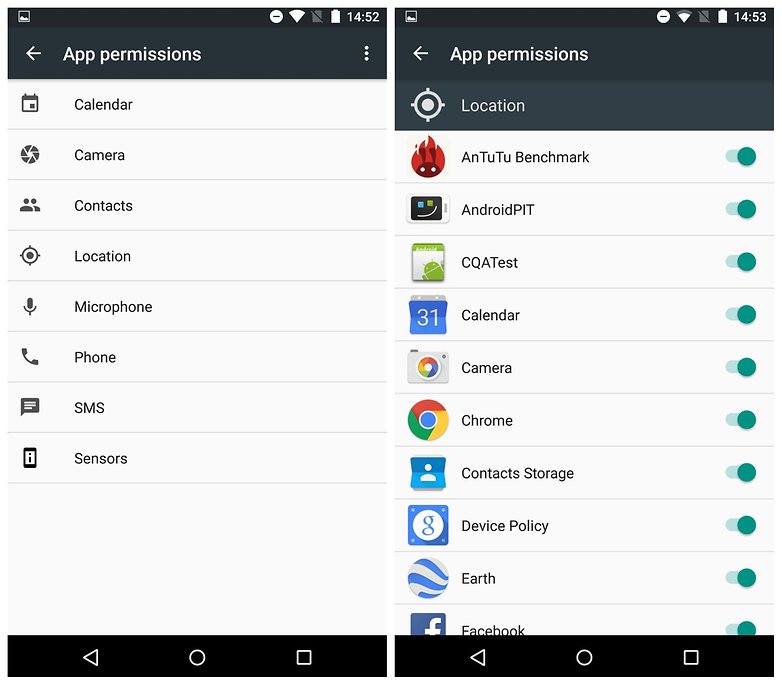
You can also view a list of permissions to see which have been granted to which apps. Just go to Settings > Apps, then tap the overflow menu in the top right corner and go to Advanced > App Permissions.
AndroidPIT Android M preview app permissions location

2. Customize Quick Settings using System UI Tuner

To enable the System UI Tuner, bring down your Quick Settings menu (swipe down from the top of your phone with two fingers) and tap and hold the settings button (cog wheel) for five seconds. When you let go you will be asked if you would like to enable System UI Tuner. Select yes and you'll see System UI Tuner at the bottom of your Settings list.
AndroidPIT Android M preview system ui tuner
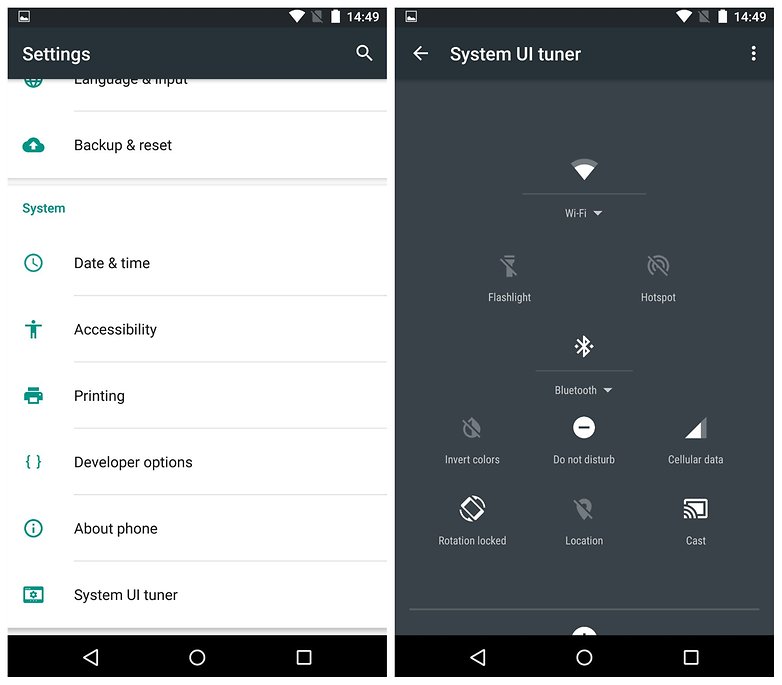
In System UI Tuner, tap Quick Settings and you'll see a mockup of your Quick Settings shade. You can add tiles (press the + at the bottom), move the toggles around (tap and drag) or delete toggles (tap and drag to the bottom). Your changes will be reflected in the Quick Settings menu.

3. Get to know RAM Manager

Android Marshmallow is all about giving us even more power over our beloved Androids, and RAM is a huge part of that. Go to Settings > Memory > Memory used by apps, to see a list of all your memory-hogging apps.
androidpit ram manager android marshmallow
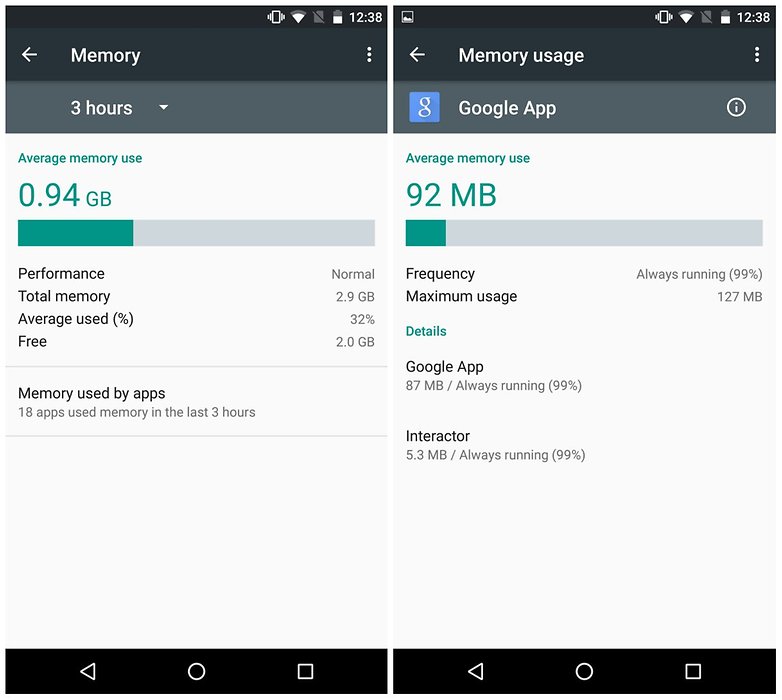
Tapping an entry will show you detailed info and give you the option to force stop the app if necessary. Take some time to familiarize yourself with this part of your Android – it's a great tool to help you understand what RAM usage is normal and what's out of the ordinary.

4. Find your Downloaded, Running, All and Disabled app tabs

The RAM Manager is also effectively the new home for the 'Running' tab that was in previous versions of the Settings > Apps section. Unlike previous Android versions, Android Marshmallow doesn't break your apps list down into tabs for 'Downloaded', 'Running', 'All' and 'Disabled'.
AndroidPIT Android M preview all apps tab disabled enabled
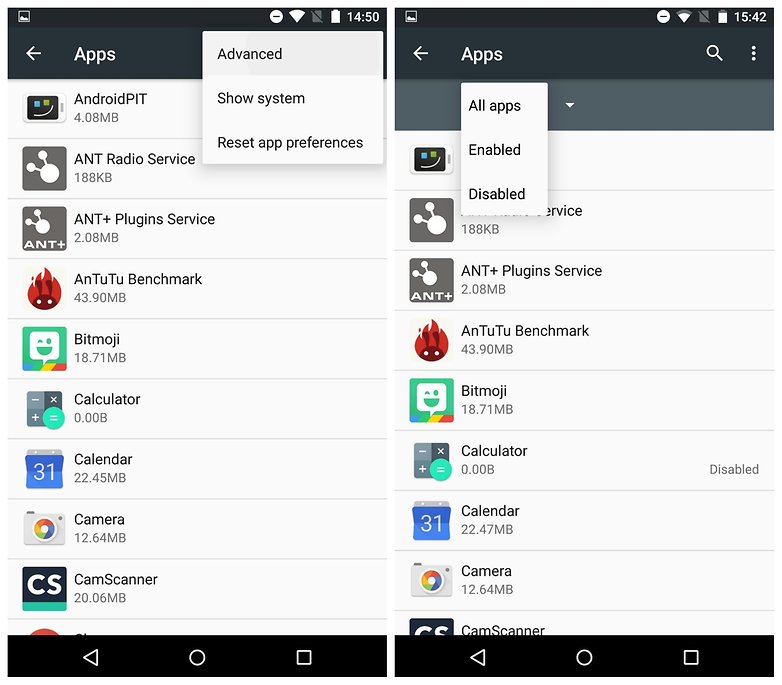
The 'Running' tab now appears as RAM Manager; 'All' and 'Disabled' are now options in a drop-down menu, accessible once you've disabled at least one app. The default view in Settings > Apps is the 'All' apps tab. We'll have to wait and see how devices with SD cards display the information that was previously found in the 'SD Card' tab.

5. Automatically associate links

Android Marshmallow allows you to automatically associate specific apps with specific types of links. So if someone emails you a Twitter link, for example, you can set Twitter as the default app for opening such links, rather than picking from a list every time.

Although you could set certain apps as default apps before, the system didn't work all that well. Now you can associate specific domain URLs with an app of your choice. For example, all facebook.com links can be set to open either in Facebook, Tinfoil or another third-party Facebook app automatically.
AndroidPIT Android M preview app links open by default facebook
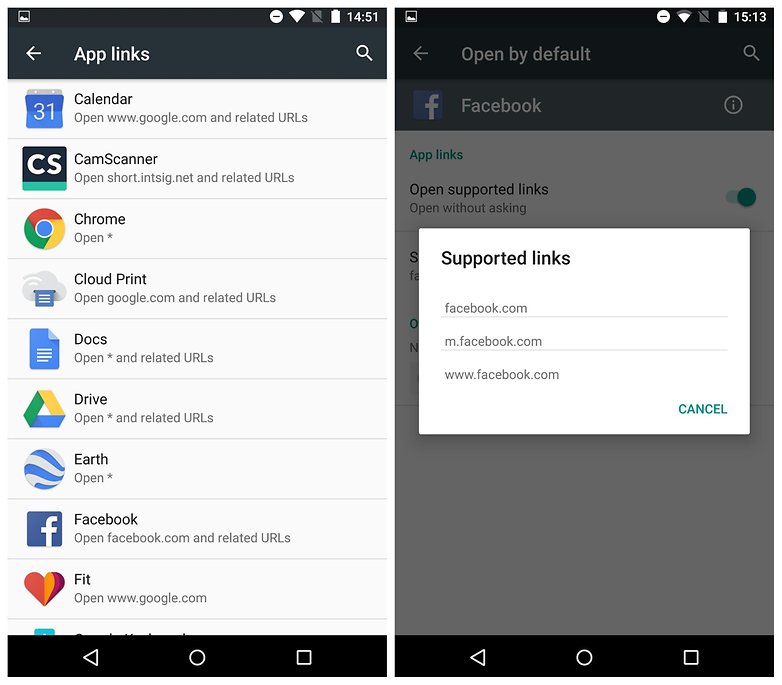
To do this, go to Settings > Apps, then tap the overflow menu at the top right and go to Advanced > App Links, then flip the switch for the apps that you want to set to automatically intercept links from specific domains.

6. Activate Google Now from the lock screen

You might have missed this one, but the lock screen shortcut to the dialer has been replaced by Google Now. This is a welcome change; you can use Google Now to call someone just by speaking (along with plenty of other things), so you haven't lost out on functionality by losing the dialer shortcut.

Simply swipe from the bottom left-hand corner of the lock screen to get Google Now ready to receive your voice command.

7. Enjoy Google Now on Tap

Google Now on Tap is easily my favorite feature in Android Marshmallow. It brings Google Now functionality to every part of your phone or tablet.

There's no need to switch apps or copy and paste phrases anymore – once it's enabled, you can bring up Google Now on Tap from any app, simply by selecting text and long-pressing the Home button.

8. Disable notification peeking 

Heads-up notifications, or 'peeking' as it is now referred to, is the feature that allows notifications to pop up over the top of your display. It was introduced in Android Lollipop, but since app developers now tend to enable peeking by default, Android Marshmallow gives you the power to decide if you want to allow it or not.
androidpit app notifications marshmallow peek
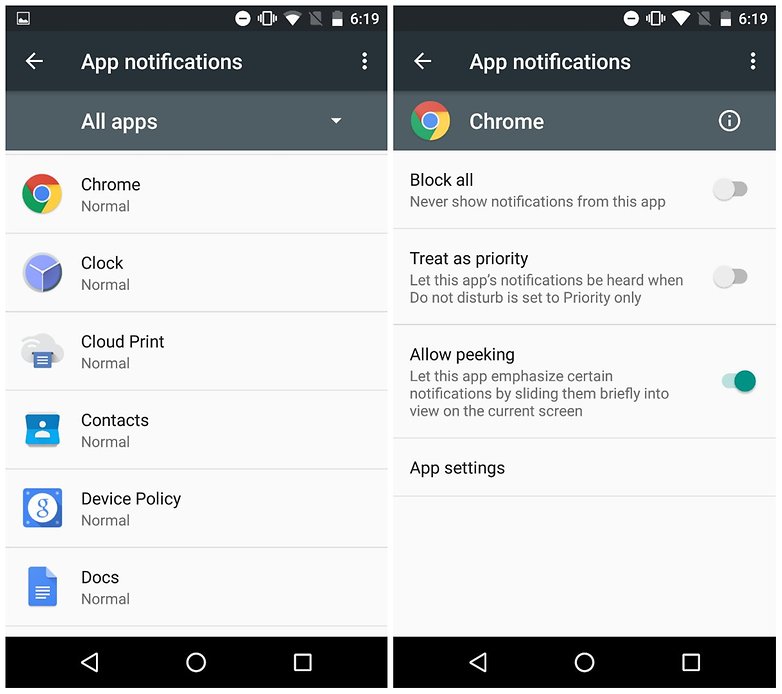
If these types of notifications bother you, you can go into Settings > Sound & Notifications > App Notifications, then select the app they're coming from, and switch off Allow peeking.

9. Check out the Android Marshmallow Easter Egg

The Android Easter Egg is one of the most pointless but fun parts of any new Android version. You simply go to Settings > About Phone and repeatedly tap the Version Number to find it. In Lollipop you'd see a giant lollipop, and if you long-pressed it, you'd be taken to a Flappy Bird clone.
android marshmallow easter egg
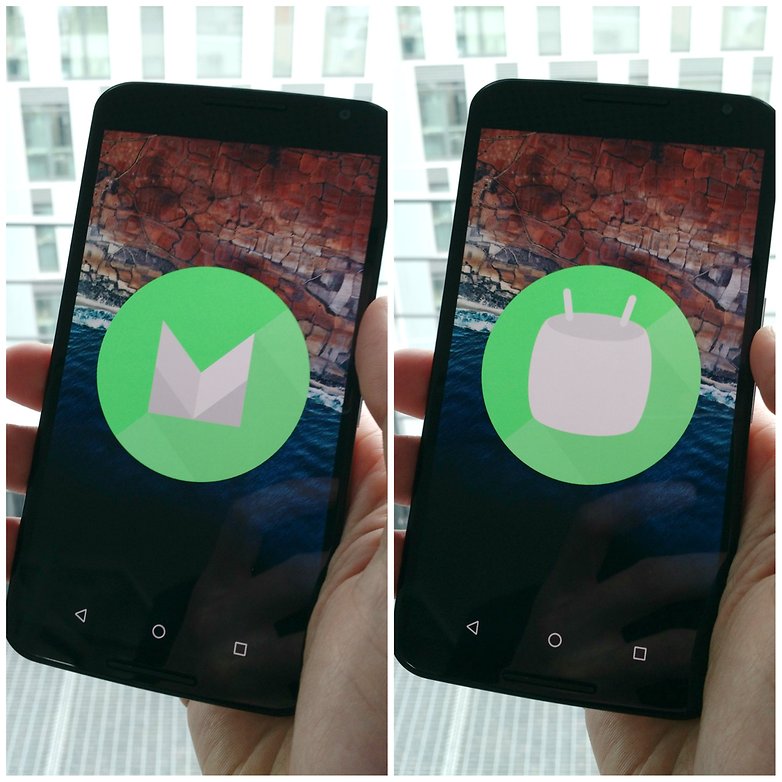
In Marshmallow, tapping the version number, reveals a graphic of the letter M. When you tap it again, you get a marshmallow with android antenna.

10. Access the Marshmallow file manager

Did you know Android Marshmallow comes with its own built-in file explorer? Well it does. Go to Settings > Storage & USB > Explore to... er, explore it.
android marshmallow file explorer
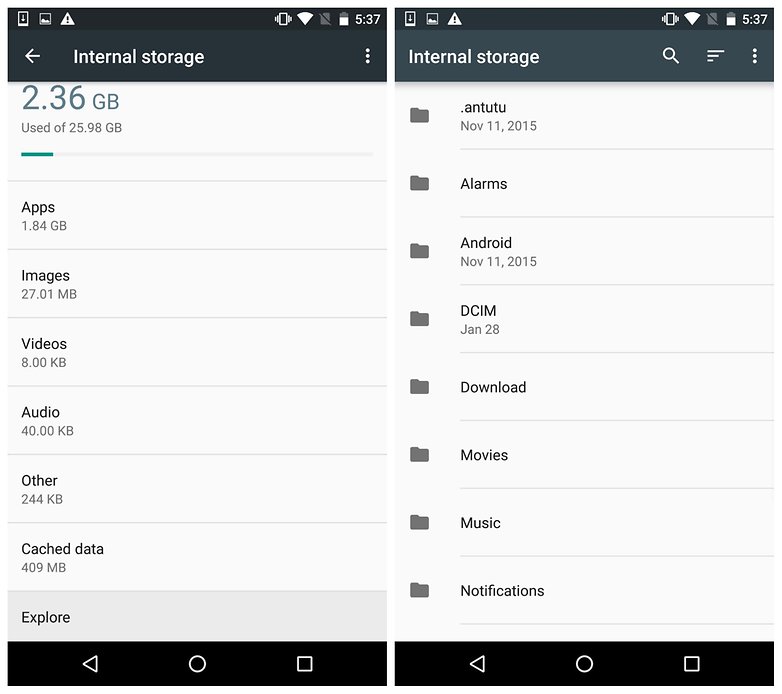
Marshmallow's solution might not be as in-depth and feature packed as something like ES File Explorer, but it's also less intrusive. Check it out for a clean, minimal interface for browsing files.

Found any other hot Android Marshmallow tips and tricks you can share? What's your favorite? Let us know in the comments.

How to save battery life on your Android device

Smartphone batteries don't last forever, and some devices have an almost-embarrassing screen-on time. Those big, luscious AMOLED and LCD screens and taxing apps are an obvious drain on your battery, but there are lots of things you can do behind-the-scenes to make your Android last longer. Let's explore how to increase battery on your smartphone.

How Android batteries work

First, some background: most smartphones have either a lithium-ion battery or a lithium-polymer battery. Both are actually lithium-ion though, and as such, do not have a 'memory', which means you can charge them from any level – you don't have to fully discharge them before charging them up – and you don't have to charge them all the way to 100 percent.

In fact, these types of batteries suffer from low voltage problems, so it's actually better to partially charge them (say, from 20 percent to 90 percent) than to fully charge and fully drain them. Battery care is always open for debate though, so for every accepted tip there will be someone that says it makes no difference. Just find the ones that work for you and you can increase battery on your Android device.

To our chagrin, most flagship devices released in 2016 don't have removable batteries. This looks like it won't change anytime soon. And despite most of them being close to 3,000 mAh they still need to be optimized, especially for Pokémon Go. Take advantage of some of the tips below and really get the most out of your smartphone.

  • Use Greenify

Unlike many Android apps that claim to optimize performance and increase battery life, Greenify actually works. Greenify allows you to put other apps into hibernation when they aren't in use, preventing them from operating in the background.

This frees up system resources and boosts battery performance, but requires a bit of thought. For Greenify to be effective you can't just hibernate every installed app. But since there are a lot of Android apps that perform actions you don't know about, or necessarily want, this is a useful tool.
AndroidPIT how to safe battery life 1
This can be helpful in many situations. For example, you might use the Amazon app to browse for things to buy, but don't want it to operate in the background or send notifications. There might be other apps on your Android device operating in the background without a good reason. Greenify stops this by sending those apps into hibernation, which reduces their impact on the system, saving battery life while improving performance.

  • Don't use adaptive/auto brightness

Don't use display auto-brightness. It may sound useful, but auto-brightness is usually way brighter than you really need. It's better to manually set the brightness to a level that is low but comfortable, and bump it up when necessary. This is one of the best ways to improve your battery life, because the screen is one of the biggest battery suckers.
AndroidPIT how to safe battery life 2
To ensure your adaptive/auto brightness is off go into the Quick settings in many devices and you should see Auto with a box above and a checkmark in it. Uncheck this box and your auto will be off. With some devices you might need to go into the Settings then tap Display. From there you should see Brightness level and in it you'll find the auto settings.

  • Set your 'Do Not Disturb' or 'sleep' schedule 

Set sleep times or blocking mode to switch off Wi-Fi and mobile data when you don't need them. If your phone is basically off limits at work, set your device to not ring, vibrate or connect to the internet while you're at work. Many phones have a Do Not Disturb setting for just this purpose.

Likewise, you can set your phone to airplane mode when you're asleep or use sleep or blocking modes to set up limits for what your phone does during certain times of the day, whether that's while you're asleep, at work or in a meeting. Cool apps such as IFTTT let you create rules that can help you save battery life too.

  • You don't need to be connected 24/7

Turn off GPS, Bluetooth, NFC, Wi-Fi and mobile data whenever you don't need them. Turning off location data, or changing your location settings to use Wi-Fi or 3G data rather than GPS works perfectly well. This will increase battery on your Android device.

Only turn on Bluetooth and NFC as long as you need them (even though they consume very little power), and there's no need to have both Wi-Fi and mobile data turned on at all times, especially if you know exactly when you'll need one or the other.

If you use Wi-Fi a lot though, say at home and at work, then it makes sense to keep set your Wi-Fi to 'Always on during sleep' as this uses less power than to have your Wi-Fi reconnecting every time you wake your phone. Most of these can be found in your Quick settings.

  • Explore the battery saving features on your phone

All ROMs, whether stock Android, OEM UIs such as TouchWiz, or custom ROMs like CyanogenMod, have various settings in the menu to help conserve or optimize battery consumption.

HTC has Extreme Power Saving Mode, Samsung has Ultra Power Saving Mode, Sony has STAMINA mode and so on. Find these various options for your device and ROM and make them work for you.
AndroidPIT how to safe battery life 4
Even if your phone doesn't have layers of battery saving features like some (or you simply don't want disable so many features), at least make use of the basic battery saver mode. Even stock Android Lollipop has it by default and Android M has the great Doze feature (as mentioned above) to help reduce battery consumption while your phone is asleep.

  • Don't fall into the auto-sync trap

Turn off auto-syncing for Google accounts. If you don't need every single Google account updated every 15 minutes, just go into Settings and Google account and turn off auto-sync for those apps you don't need constantly updated.

Some apps – like email – let you manually refresh when you launch them, rather than running multiple auto-refreshes throughout the day when you may not need them to. The same goes for Twitter, Reddit and co. Unless you need constant updates or push notifications (like for Facebook or your calendar) just sync when you actually use the app.

Did we miss anything? What are your best battery saving tips? Tell us about them in the comments.


Copyright @ 2013 Android Master.